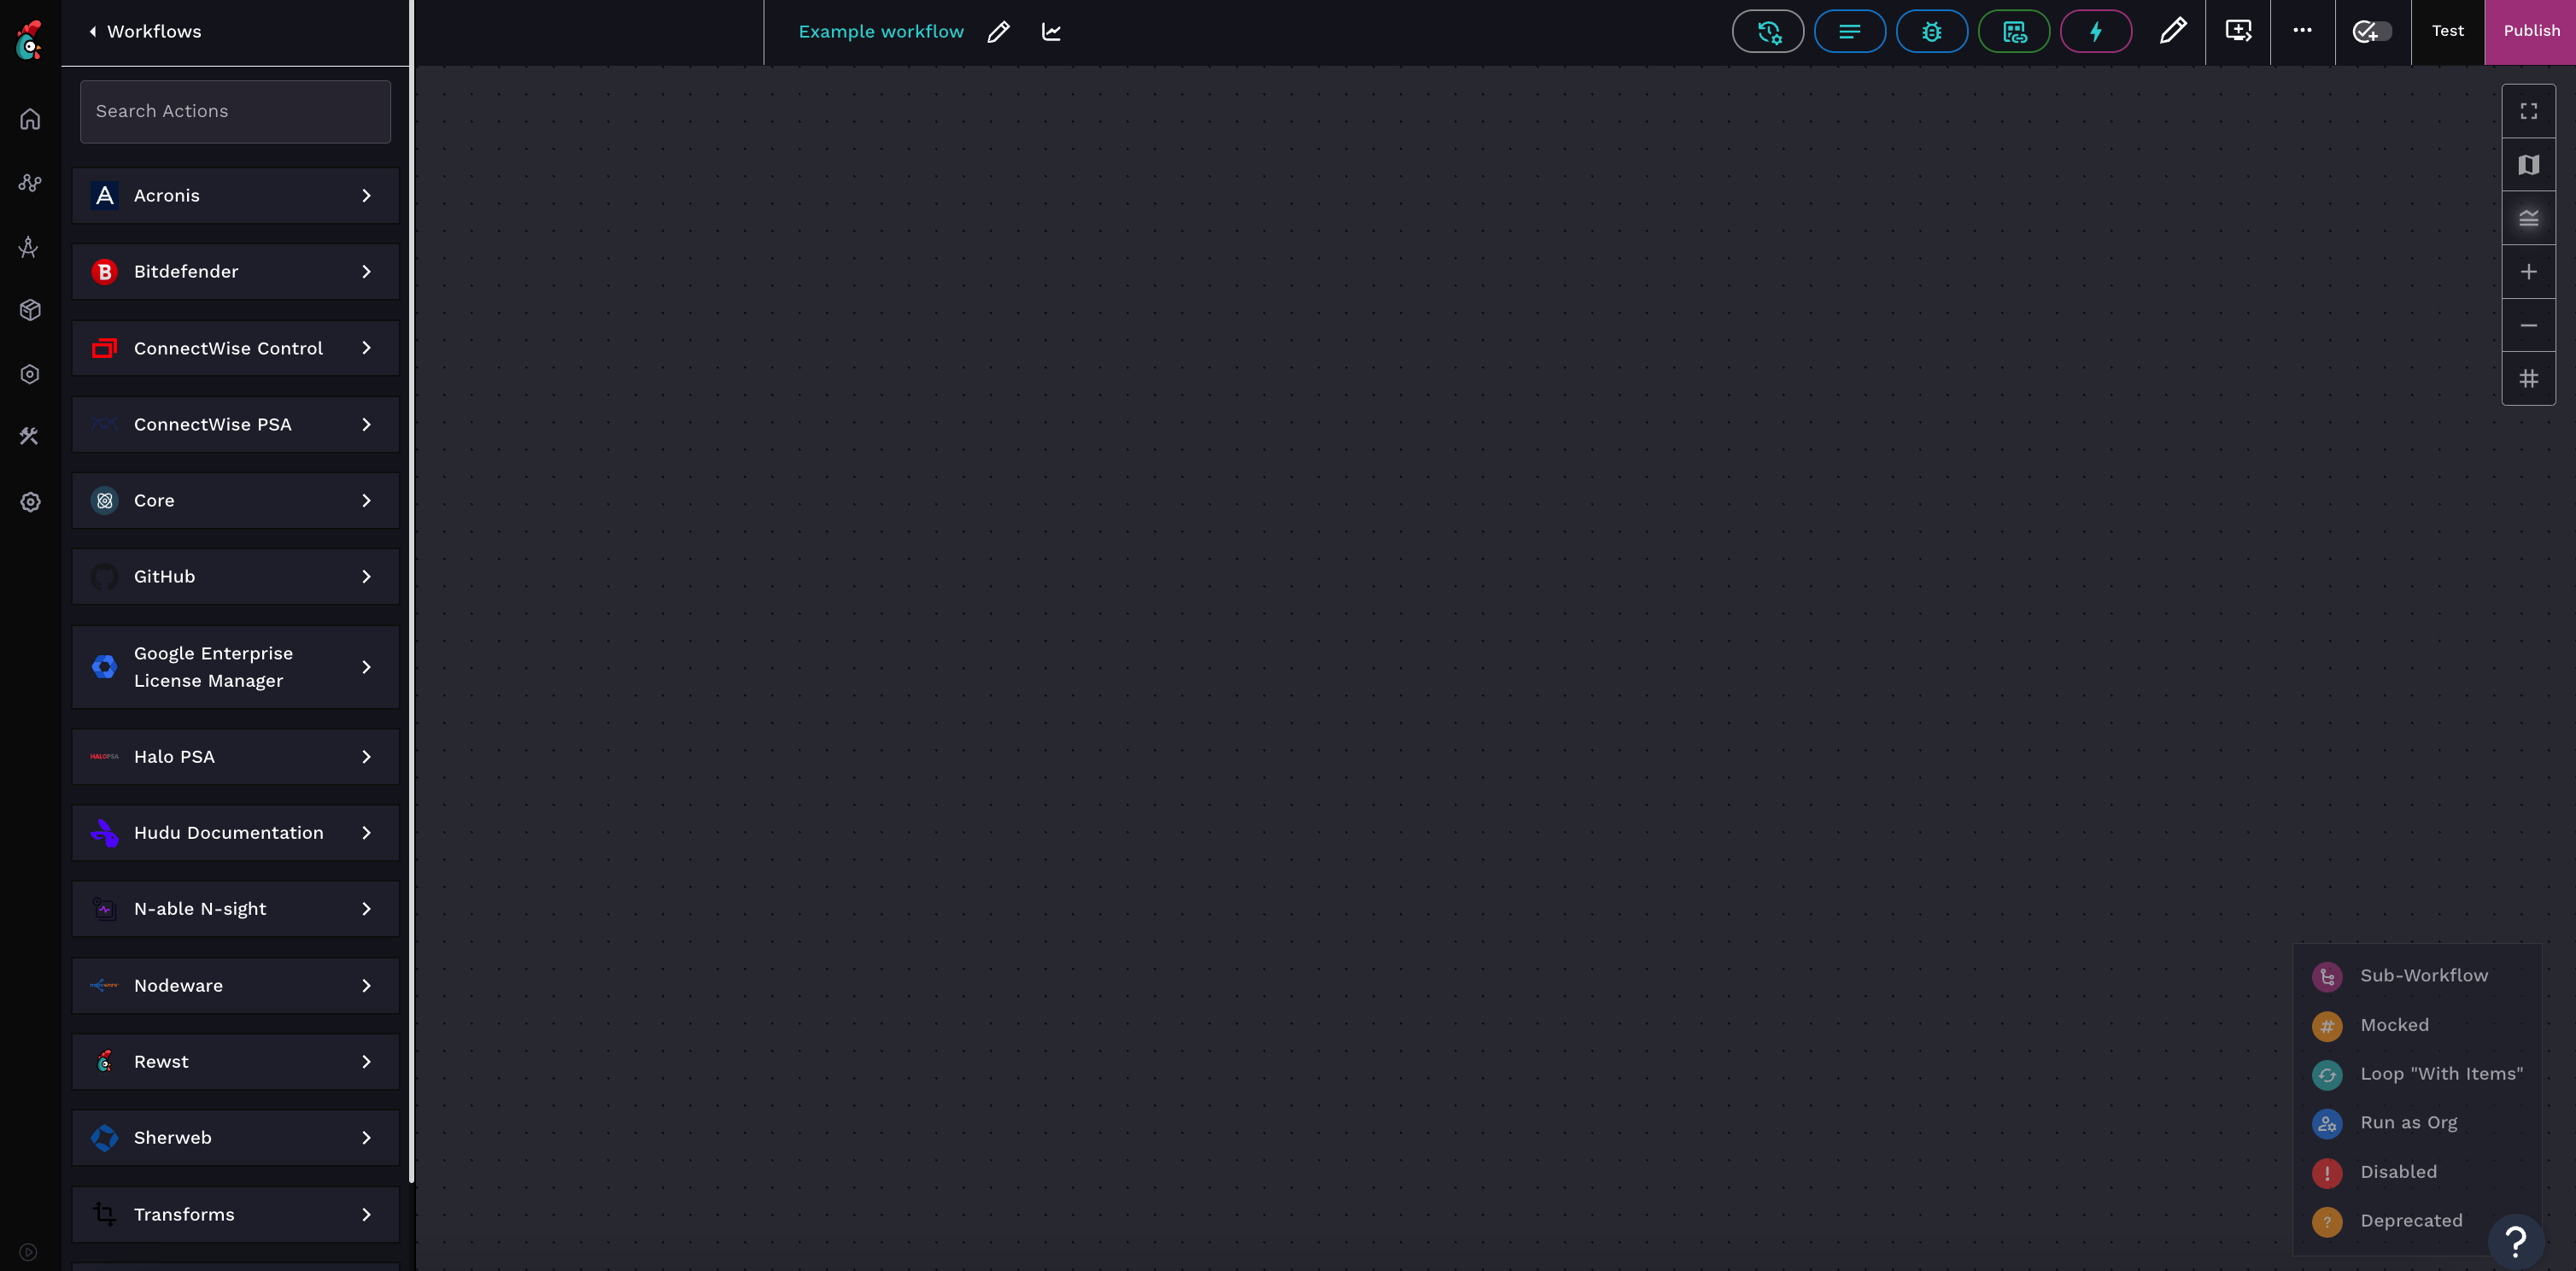
A blank workflow builder canvas, as seen for a freshly created workflow
A blank workflow builder canvas, as seen for a freshly created workflow

 **:** Click to open up a dialogue where you can change the name of your workflow.
**View results for workflow**
**:** Click to open up a dialogue where you can change the name of your workflow.
**View results for workflow**  : This opens up a new tab in your browser with the entire recorded execution history of that workflow.
**History**
: This opens up a new tab in your browser with the entire recorded execution history of that workflow.
**History**  : Click to open a menu on the right side of your screen displaying the record of when the workflow was created and edited. You also have the option to revert back to a previous version of your workflow, or view previous versions to compare changes.
**Notes**
: Click to open a menu on the right side of your screen displaying the record of when the workflow was created and edited. You also have the option to revert back to a previous version of your workflow, or view previous versions to compare changes.
**Notes**  : Click to open the **Notes** menu, where you can view a record of all notes made on the workflow, and view instructions for how to add new notes. For more information on notes, see the [#add-edit-or-delete-workflow-notes](#add-edit-or-delete-workflow-notes "mention") section of this document.
**Execution History**
: Click to open the **Notes** menu, where you can view a record of all notes made on the workflow, and view instructions for how to add new notes. For more information on notes, see the [#add-edit-or-delete-workflow-notes](#add-edit-or-delete-workflow-notes "mention") section of this document.
**Execution History**  : This reveals the same information as History, but provides an easy way to view the data without leaving your workflow builder.
**Data Aliases**
: This reveals the same information as History, but provides an easy way to view the data without leaving your workflow builder.
**Data Aliases**  : Click to view a list of all set [data aliases](https://docs.rewst.help/~/revisions/VmxzEdeNWvX54TqYxxOB/documentation/automations/workflows/data-aliases). Click on the data alias to take you directly to that action.
**Add Trigger**
: Click to view a list of all set [data aliases](https://docs.rewst.help/~/revisions/VmxzEdeNWvX54TqYxxOB/documentation/automations/workflows/data-aliases). Click on the data alias to take you directly to that action.
**Add Trigger**  : Click to open up the **Add Trigger** form, where you can set up your [trigger](https://docs.rewst.help/~/revisions/VmxzEdeNWvX54TqYxxOB/documentation/automations/intro-to-triggers)'s configuration, parameters, criteria, and activated organizations.
**Configure Workflow Settings**
: Click to open up the **Add Trigger** form, where you can set up your [trigger](https://docs.rewst.help/~/revisions/VmxzEdeNWvX54TqYxxOB/documentation/automations/intro-to-triggers)'s configuration, parameters, criteria, and activated organizations.
**Configure Workflow Settings**  : Click to open the menu that contains the settings for workflow type, workflow timeout, time saved, and variable, [input, and output configuration](https://docs.rewst.help/~/revisions/VmxzEdeNWvX54TqYxxOB/documentation/automations/workflows/data-input-and-output-input-variables-and-context-variables).
**Workflow Completion Handlers**
: Click to open the menu that contains the settings for workflow type, workflow timeout, time saved, and variable, [input, and output configuration](https://docs.rewst.help/~/revisions/VmxzEdeNWvX54TqYxxOB/documentation/automations/workflows/data-input-and-output-input-variables-and-context-variables).
**Workflow Completion Handlers**  : Click to open a submenu where you can set [completion handlers](https://docs.rewst.help/documentation/workflows/completion-handlers). Click the button a second time to collapse the menu.
**Workflow Options**
: Click to open a submenu where you can set [completion handlers](https://docs.rewst.help/documentation/workflows/completion-handlers). Click the button a second time to collapse the menu.
**Workflow Options**  : Click to open a submenu where you can export, clone, or delete your workflow, as well as edit the workflow's attributes.
**Display Validation Errors**
: Click to open a submenu where you can export, clone, or delete your workflow, as well as edit the workflow's attributes.
**Display Validation Errors**  : By default, this is set to off. When toggled on, Rewst will provide an error on required fields that aren't filled out, and add a message about the field being required beneath the field in red text. The text will be invisible until the user clicks on the field and then click out of it without entering a value.
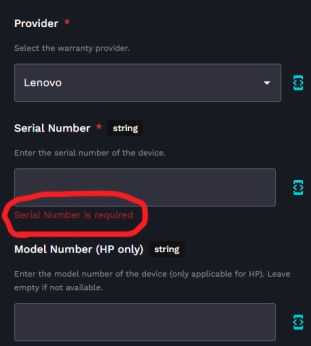
An example of the message, when the setting is toggled on
 : Click to run a test of your workflow as it appears on your workflow builder canvas, and view the results of that test. Note that this also publishes and saves the workflow.
**Publish**
: Click to run a test of your workflow as it appears on your workflow builder canvas, and view the results of that test. Note that this also publishes and saves the workflow.
**Publish**  : Click to publish changes on your workflow without first running a test, which will push the updated version live for use. This also offers a dual screen code viewer, to compare your old workflow to your new one.
## Build a workflow
### Set up the trigger
{% hint style="success" %}
Recall that every workflow is kicked off by a trigger. Which trigger you choose will depend on the goals of your workflow. There's no right or wrong order to build your workflow as long as it contains all the correct parts at the time of publication. You could start with adding actions to your canvas first, then set up your trigger.
If your trigger is form, you'll need to create and set up that form first before pulling it into your workflow.
{% endhint %}
1. Click
: Click to publish changes on your workflow without first running a test, which will push the updated version live for use. This also offers a dual screen code viewer, to compare your old workflow to your new one.
## Build a workflow
### Set up the trigger
{% hint style="success" %}
Recall that every workflow is kicked off by a trigger. Which trigger you choose will depend on the goals of your workflow. There's no right or wrong order to build your workflow as long as it contains all the correct parts at the time of publication. You could start with adding actions to your canvas first, then set up your trigger.
If your trigger is form, you'll need to create and set up that form first before pulling it into your workflow.
{% endhint %}
1. Click  to add a new trigger.
2. Name your trigger with something simple but descriptive.
3. Toggle **Enabled** to on.
4. Search for your desired trigger in the **Trigger Type** drop down menu. Depending on your trigger, new **Trigger Parameters** will appear as a new section in the setup menu with additional selections to be made to set parameters for the trigger. For example, if your trigger is a [form](https://docs.rewst.help/documentation/forms), you would be asked to select the name of an existing form to use as the trigger.
5. If needed, add an [integration override](https://docs.rewst.help/~/revisions/VmxzEdeNWvX54TqYxxOB/documentation/intro-to-triggers#create-a-trigger).
6. Set your trigger criteria, if required for your workflow.
7. Think about which organizations you want the trigger to run for.
1. **Selected Organization (Org Name)** will be toggled on by default. Toggle to off if desired.
2. If you want the automation to work for your main org as well as all child organizations, toggle **All current and future managed organizations** to on.
3. If you want the automation to apply only for certain organizations, select them manually in the **Organizations** selector field.
8. Click **Submit** to save the trigger.
{% hint style="info" %}
A workflow can be called by multiple forms through the use of triggers. All that is required is to open the workflow and create a new trigger with **Core - Form Submission** selected for the Trigger Type.
{% endhint %}
### Create the workflow
1. Click **Create**.
2. Give your workflow a **Name**, and add any tags you would like via the **Tags** drop-down selector.
3. Click **Submit**. This will launch the workflow builder.
### Drag the action
1. Search for your desired action in the left side menu.
2. Click on it, drag it, and drop it onto the canvas.
3. Repeat this process to add all needed actions to your workflow.
### Configure tasks
{% hint style="info" %}
Remember, once an action is placed on the canvas, we then call it a task.
{% endhint %}
1. Click on the placed task, which will open a configuration dialog featuring two sections:
1. A set of basic details fields at the top:
1. **Name**: A user-editable field for the task's identifier.
2. **Reference**: The integration pack and task description.
3. **Output**: Specifies where the task's output gets stored in the task logs.
4. **Task ID**: The unique ID for referencing this task.
5. **Description**: A user-fillable text box for additional task information.
6. **Publish Result As**: A friendly name you assign for the task's results that you can use as an a context variable for calling it's content in future tasks.
2. Four distinct tabs beneath the basic details:
1. **Parameters**: Unique to each task, this tab houses options for defining the task's behavior during execution, including settings for endpoints, filters, conditions, and query parameters.
1. Note the **Redact on Hover** setting for inputs that are set to **Password**. This can be toggled on or off via the .
2. **Advanced**: In this tab, you'll set the rules for your task's path and behavior within the workflow. Options include Integration Overrides, Transition Mode, Task Transition Criteria Sensitivity, Run as Org, With Items, Items Concurrency, and Task Timeout. See more about this on the [Advanced Workflow Operations](https://docs.rewst.help/~/revisions/VmxzEdeNWvX54TqYxxOB/documentation/automations/workflows/advanced-workflow-operations-menu) page.
3. **Mocking**: This tab provides the option to simulate the task's function with a user-defined result, useful for testing and debugging.
4. **Time Savings**: In this tab, specify your estimate of the time a human would need to complete the task. This is used for creating Time Entries in PSA platforms.
5. **Security**: This tab allows for meticulous redaction of sensitive information within workflow tasks. This is especially vital when using generic HTTP actions for services without official integrations, where API tokens or other sensitive data in headers could be exposed in results.
1. In the **Redacted Input Parameters** and **Redacted Output Parameters** fields, customize redaction with [JSONPath queries](https://jsonpath.com/).
2. These queries can be entered manually in the editor, or chosen from the field's drop-down selector.
2. Remember to add [transitions](https://docs.rewst.help/documentation/workflows/configuring-your-workflow-tasks/navigating-between-tasks-with-transitions) between your tasks.
3. Click **Test** to see if your workflow executes as desired.
4. Click **Publish** to save your changes and push them to the desired effect.
### Add time saved to a workflow
One of the key metrics you can use to understand the value added by your automations is time saved. You can configure this in Rewst by identifying how long it takes to manually work through your process before automating it and adding it into your workflow.
{% hint style="info" %}
**Considerations for time saved**
When determining how much time to set for any given process, it's a good practice to consider not only how much time it may take you or your most experienced tech to go through that process manually, but also how much time it takes to fix any human errors that may happen during this process.
{% endhint %}
1. Click on the workflow that you want to configure.
2. Click on **Configure Workflow Variables**
to add a new trigger.
2. Name your trigger with something simple but descriptive.
3. Toggle **Enabled** to on.
4. Search for your desired trigger in the **Trigger Type** drop down menu. Depending on your trigger, new **Trigger Parameters** will appear as a new section in the setup menu with additional selections to be made to set parameters for the trigger. For example, if your trigger is a [form](https://docs.rewst.help/documentation/forms), you would be asked to select the name of an existing form to use as the trigger.
5. If needed, add an [integration override](https://docs.rewst.help/~/revisions/VmxzEdeNWvX54TqYxxOB/documentation/intro-to-triggers#create-a-trigger).
6. Set your trigger criteria, if required for your workflow.
7. Think about which organizations you want the trigger to run for.
1. **Selected Organization (Org Name)** will be toggled on by default. Toggle to off if desired.
2. If you want the automation to work for your main org as well as all child organizations, toggle **All current and future managed organizations** to on.
3. If you want the automation to apply only for certain organizations, select them manually in the **Organizations** selector field.
8. Click **Submit** to save the trigger.
{% hint style="info" %}
A workflow can be called by multiple forms through the use of triggers. All that is required is to open the workflow and create a new trigger with **Core - Form Submission** selected for the Trigger Type.
{% endhint %}
### Create the workflow
1. Click **Create**.
2. Give your workflow a **Name**, and add any tags you would like via the **Tags** drop-down selector.
3. Click **Submit**. This will launch the workflow builder.
### Drag the action
1. Search for your desired action in the left side menu.
2. Click on it, drag it, and drop it onto the canvas.
3. Repeat this process to add all needed actions to your workflow.
### Configure tasks
{% hint style="info" %}
Remember, once an action is placed on the canvas, we then call it a task.
{% endhint %}
1. Click on the placed task, which will open a configuration dialog featuring two sections:
1. A set of basic details fields at the top:
1. **Name**: A user-editable field for the task's identifier.
2. **Reference**: The integration pack and task description.
3. **Output**: Specifies where the task's output gets stored in the task logs.
4. **Task ID**: The unique ID for referencing this task.
5. **Description**: A user-fillable text box for additional task information.
6. **Publish Result As**: A friendly name you assign for the task's results that you can use as an a context variable for calling it's content in future tasks.
2. Four distinct tabs beneath the basic details:
1. **Parameters**: Unique to each task, this tab houses options for defining the task's behavior during execution, including settings for endpoints, filters, conditions, and query parameters.
1. Note the **Redact on Hover** setting for inputs that are set to **Password**. This can be toggled on or off via the .
2. **Advanced**: In this tab, you'll set the rules for your task's path and behavior within the workflow. Options include Integration Overrides, Transition Mode, Task Transition Criteria Sensitivity, Run as Org, With Items, Items Concurrency, and Task Timeout. See more about this on the [Advanced Workflow Operations](https://docs.rewst.help/~/revisions/VmxzEdeNWvX54TqYxxOB/documentation/automations/workflows/advanced-workflow-operations-menu) page.
3. **Mocking**: This tab provides the option to simulate the task's function with a user-defined result, useful for testing and debugging.
4. **Time Savings**: In this tab, specify your estimate of the time a human would need to complete the task. This is used for creating Time Entries in PSA platforms.
5. **Security**: This tab allows for meticulous redaction of sensitive information within workflow tasks. This is especially vital when using generic HTTP actions for services without official integrations, where API tokens or other sensitive data in headers could be exposed in results.
1. In the **Redacted Input Parameters** and **Redacted Output Parameters** fields, customize redaction with [JSONPath queries](https://jsonpath.com/).
2. These queries can be entered manually in the editor, or chosen from the field's drop-down selector.
2. Remember to add [transitions](https://docs.rewst.help/documentation/workflows/configuring-your-workflow-tasks/navigating-between-tasks-with-transitions) between your tasks.
3. Click **Test** to see if your workflow executes as desired.
4. Click **Publish** to save your changes and push them to the desired effect.
### Add time saved to a workflow
One of the key metrics you can use to understand the value added by your automations is time saved. You can configure this in Rewst by identifying how long it takes to manually work through your process before automating it and adding it into your workflow.
{% hint style="info" %}
**Considerations for time saved**
When determining how much time to set for any given process, it's a good practice to consider not only how much time it may take you or your most experienced tech to go through that process manually, but also how much time it takes to fix any human errors that may happen during this process.
{% endhint %}
1. Click on the workflow that you want to configure.
2. Click on **Configure Workflow Variables**  to edit the workflow.
3. Enter the amount of seconds it takes for the process in **Time Saved (seconds)**.
4. Click **Submit**.
### Add, edit, or delete workflow notes
{% hint style="info" %}
Rewst now also offers our [RoboRewsty](https://docs.rewst.help/~/revisions/VmxzEdeNWvX54TqYxxOB/documentation/automations/workflows/document-with-roborewsty) note taking feature, to automate your documentation. Choose to document manually, or with RoboRewsty.
{% endhint %}
Notes are a great way to jot down your thinking behind workflow aspects, and an essential step to building workflows for any team that has multiple employees editing workflows. They save in the workflow itself, and can be viewed via the
to edit the workflow.
3. Enter the amount of seconds it takes for the process in **Time Saved (seconds)**.
4. Click **Submit**.
### Add, edit, or delete workflow notes
{% hint style="info" %}
Rewst now also offers our [RoboRewsty](https://docs.rewst.help/~/revisions/VmxzEdeNWvX54TqYxxOB/documentation/automations/workflows/document-with-roborewsty) note taking feature, to automate your documentation. Choose to document manually, or with RoboRewsty.
{% endhint %}
Notes are a great way to jot down your thinking behind workflow aspects, and an essential step to building workflows for any team that has multiple employees editing workflows. They save in the workflow itself, and can be viewed via the  notes button by anyone who has permissions to edit that workflow. These boxes provide a title and a markdown editor.
{% hint style="warning" %}
Adding notes is disabled for synced clone workflows.
{% endhint %}
1. Right-click the canvas and select **Add Note**. Alternatively, press and hold the **control** key, then drag your mouse to create a note.\
\

2. Click and drag it to the desired location on the canvas.
3. Hover over the upper-right
notes button by anyone who has permissions to edit that workflow. These boxes provide a title and a markdown editor.
{% hint style="warning" %}
Adding notes is disabled for synced clone workflows.
{% endhint %}
1. Right-click the canvas and select **Add Note**. Alternatively, press and hold the **control** key, then drag your mouse to create a note.\
\

2. Click and drag it to the desired location on the canvas.
3. Hover over the upper-right  icon and click **Edit Note** to edit a note's content in the right side menu.
The duplication of tasks and transitions