# Data aliases
{% hint style="info" %}
To understand this topic, you'll need to first complete Lesson 3 of the Cluck University course Automation Basics. This will introduce you to JSON and teach you how to both understand and use JSON in Rewst. If you haven't done your coursework yet, start there, then come back to this document.
{% endhint %}
## **What are Data aliases?**
A *data alias* is a shortcut that extracts specific pieces of information from a JSON response and stores them in an easy-to-use *variable*. Instead of navigating the entire JSON structure every time, a data alias pulls out exactly what you need—like a user’s name or email—and makes it accessible throughout your workflow. Think of data aliases as custom labels you assign to specific data.
Recall that *the context* is where all data generated, captured, or used in a workflow is stored. Think of it as a shared memory for a specific workflow. Data aliases are stored in the context, making them available for reuse at any step in your workflow without re-fetching the data.
For example, imagine that you've set up your Microsoft Graph integration. You send a request via API call to get info about a user. The response comes back to you in JSON format, which can be lengthy and time consuming to search through. A data alias would let you get all of the information, or pinpoint specific information like the user's name or email address, and store it in a simpler variable in the context for use.
Together, variables, data aliases, and the context make your workflows in Rewst more efficient, organized, and adaptable. These tools help you reuse workflows, reduce manual work, and customize data handling to fit any automation need.
### Data alias requirements
When adding a new data alias, you'll need the following:
* **Key**: The name you assign to specific data.
* **Value**: The actual data it corresponds to. The code editor button allows for the use of Jinja customization for intricate data or expressions.
### Data alias context example
If you set an alias such as `my_task_result -> {{ RESULT }}`, later tasks can refer to this data using `{{ CTX.my_task_result }}`.
You can also use a data alias to extract specific information and manipulate data. Expanding on our example from above, take the input from the Microsoft Graph get user action and extract the user's name and user principal name for ease of use.
1. Drag the **Get User** action onto the workflow builder canvas.
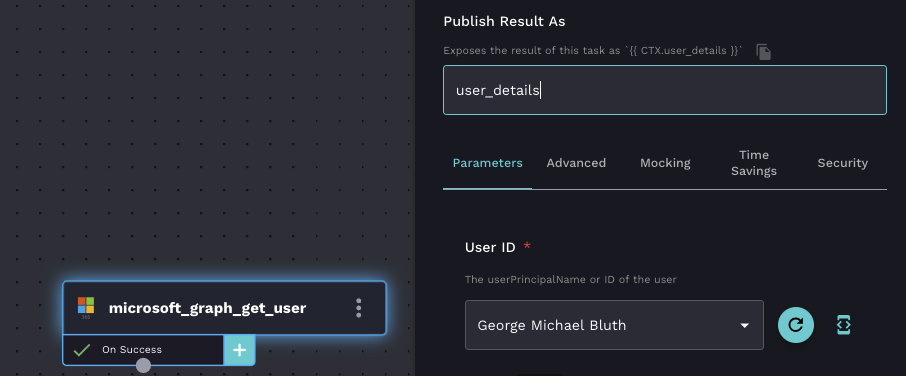
2. Add your user into the **User ID** field.
3. Set your context variable name under **Publish Result As.** The workflow action results will be stored as the value.
4. Add your data alias name. Click to open the Jinja editor and set up your data alias.
5. Use the following Jinja to create a new dictionary object and set the `displayName` and `userPrincipalName` keys.
```
{{
{
"displayName": CTX.user_details.data.value.displayName,
"userPrincipalName": CTX.user_details.data.value.userPrincipalName
}
}}
```
6. Run the workflow. Then, click **View Results**
7. Click **Load Context.**
8. Expand the context to see our data alias `filtered_user_details` now only showing the `displayName` and `userPrincipalName` .
## Add a data alias to a workflow
Data aliases are added via transitions. See more about how to use [transitions in workflows here](https://docs.rewst.help/~/revisions/VmxzEdeNWvX54TqYxxOB/documentation/automations/workflows/task-transitions).
1. Click to add your data alias.
2. Paste the key into the **key** field. Click to open the Jinja editor and set up your data alias.
3. Click to remove a data alias.
4. Click  and to move multiple data aliases up and down in the data alias list.
## Access data aliases in a workflow
1. Navigate to **Automations > Workflows**.
2. Search for your desired workflow.
3. Click **>** to the far right of that workflow to open its workflow builder canvas. \
4. Click to open the **Data Aliases** menu. This will display a complete list of all data aliases for that workflow.


 to open the **Data Aliases** menu. This will display a complete list of all data aliases for that workflow.