# Build a form with Rewst's Form Builder
## Create a new form
The part of Rewst you use to create and edit forms is called the *Form Builder*. To access it, navigate to **Automations > Forms**, and click .
In the **Create New Form** dialog, give your form a descriptive name. Remember, as you build more in Rewst, your list of forms will grow significantly. Following proper naming conventions will save you time in finding your right form later on.
The Form Builder is similar to Rewst's Workflow Builder in that it has a list of options on the left, called *form fields*, which can be dragged and dropped onto the canvas in the center of your screen.
Each of these options will relate to your *inputs***,** or the information that goes into the form. With the exception of the **Text/Markdown** field which is only used for presenting data to the end user, all other fields are used as data input and contain a field name, field label and field description. The field name is the variable name used within the workflow once the form has been submitted. The field label and field description are used to format the appearance of the form.
Using the correct fields ensures your workflows receive clean, organized data.
### Form field options
{% hint style="info" %}
Click on any of the below form field options to expand and see its information.
{% endhint %}
Text/Markdown
The *Text/Markdown* field lets you present text, optionally formatted with Markdown. You can also render Jinja in these fields, which can be useful for presenting organization variables, or rendering a Markdown table with data from elsewhere in the form.\
\ Drop-down
*Drop-down* fields let you select from multiple options, which can either be hard coded into the form or dynamically generated. Each option on the form has a *label* and a *value*, and default options can be preselected if specified. There are also options for:
* *Auto-Populate*: if enabled, will always pre-populate the field if only a single option has been returned.
* *Allow Custom Input*: lets the enduser write in the field and have that be the value passed into the workflow.
* *Always Skip Cache*: causes the option generator to always run instead of pulling from a cache. Note that the cache for a form field invalidates every 8 hours. Typically the first run of the day will be slower than the rest.
* *Always Override Option*: used when the auto-populate setting is enabled, this will cause the field to repopulate itself. This is needed in cases where the field is populated via an option generator and another field is being used as input for the option generator. In that case, you would need the option generator to run again, as the output would likely be different.
These are used most commonly when the list of options is being generated via an options generator *.*\
Drop-down selection is limited to a single option. For multiple options for selection, see the multi-select form field option.\
\ Multi-Select
*Multi-select* is similar to the dropdown field, but lets you select as many options as you like, up to a maximum number of options which can be specified on the field.\
\

Here are two examples, one for returning a specific item within the list, and one for checking if values are provided:
```
{{ CTX.[0].value|d }}
```
```
{{ CTX.|length > 0 }}
```
Checkbox
The *Checkbox* field provides a toggle with a true/false value for the form. You can also change the label positioning.\
\

Radio Buttons
The *Radio Buttons* field offers a selectable single option. It can also be dynamically populated in the same way as a dropdown or multi-select field, but doesn't allow for the additional options of auto-populate, allow custom input, always skip cache and always override option. For this reason, radio buttons are rarely used with dynamic options.\
\

Text Input
The *Text Input* field accepts a single line text string. You can also perform regex validation and error reporting, or populate the field with a default value.\
\

Number Input
The *Number Input* field accepts numbers, as long as they meet the Python definition of numbers: whole numbers or floats. Set a default value, as well as minimum and maximum values.\
\

Multi-Line Input
The *Multi-Line Input* field accepts large amounts of text. No validation is available for this field.\
\

Date
The *Date* field can be set up to accept dates, or times and date times together.
Note that the time zone or this field is based on your browser locale. Rewst converts the time into UTC when passed into the workflow without the time zone data. As an example, if you're in EST and you select 6pm, the workflow will receive this as 1pm UTC, due to the 5 hour offset. Adjust your submission for this time difference when you are submitting a form for a customer in a different time zone from yourself, and need to specify a time.\
\
\

File Upload
The *File Upload* field allows for the uploading of specific file types:
.CSV\
.JSON\
\
If you are working with an XL or XLSX file format, [convert it to CSV ](https://support.microsoft.com/en-us/office/import-or-export-text-txt-or-csv-files-5250ac4c-663c-47ce-937b-339e391393ba)before uploading.\
\

## Dynamic options in forms
*Dynamic options* automatically fetch data from integrations, thereby eliminating the need for manual data entry and keeping form options up-to-date with the latest data. For example, if you're managing hiring information within your PSA, dynamic options can automatically pull this data into the form, ensuring that users always have the most current information.
There are two types of dynamic options: integration reference and workflow generated.
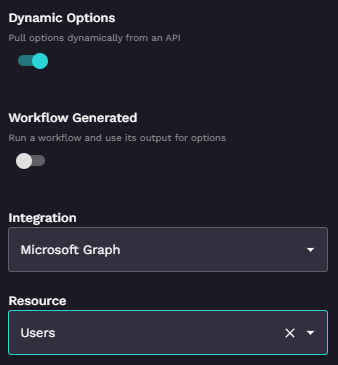
### Option one: Integration reference
A *reference option* is a dynamic field pulled directly from predefined actions. It works well for straightforward data retrieval, but may require conversion to a workflow-generated option for data manipulation, as this doesn't give any filtering options and will pull directly from the API endpoint.
#### Integration reference example
Selecting the Microsoft Graph integration to list all users.
{% hint style="info" %}
Pulling data straight from the integration like this only works at the top level organization where the integrations are installed. This option won't work for dynamically pulling suborganization data. To achieve this, you would require an [options generator](https://docs.rewst.help/~/revisions/VmxzEdeNWvX54TqYxxOB/documentation/automations/workflows/option-generator-workflows).
{% endhint %}
### Option two: Workflow generated options
If you want more flexibility around the output of the data your user is seeing, you may need to opt for a workflow generated option instead, which allows for in-depth data manipulation using [Jinja](https://docs.rewst.help/~/revisions/VmxzEdeNWvX54TqYxxOB/documentation/jinja). We cover what these are and how to use them in Cluck U’s [Rewst Foundations](https://learn.rewst.io) and [micro course](https://learn.rewst.io). If you’ve already taken our courses and want a refresher, see our documentation on option generators [here](https://docs.rewst.help/documentation/workflows/workflow-generated-options) and [here](https://docs.rewst.help/documentation/workflows/different-types-of-workflows#option-generator).
Alternatively, dynamic forms use cases can be handled with our options filter feature. The options filter makes customizing drop-down fields within forms straightforward for those who want to add filtering without updating an options generator workflow. It takes inputs, filters them, and produces an output agnostic of the data source. See our separate [options filter documentation here](https://docs.rewst.help/~/revisions/VmxzEdeNWvX54TqYxxOB/documentation/automations/forms/options-filter-filtering-in-forms).
{% hint style="info" %}
This setup requires the workflow type be an option generator. See our [option generator workflow page](https://docs.rewst.help/~/revisions/VmxzEdeNWvX54TqYxxOB/documentation/automations/workflows/option-generator-workflows) for more details on this functionality. The below documentation is high-level only.
{% endhint %}
#### Options generator example
In this image, what is shown to the user is what is set as the label for the list contents. Ultimately, it can be whatever you want it to be, using Jinja to manipulate that output correctly. The ID is the value or unique ID of what the workflow is referencing for its future actions.
#### **Set default options**
Default options can be selected for a form field linked to a workflow by following these steps.
1. Add a boolean property to each option result.
2. Define the boolean property for the **Default Selected Field** value.
Sample data returned by a workflow:
{% code lineNumbers="true" fullWidth="false" %}
```json
[
{"label": "Adam", "id": "1", "current_default": false},
{"label": "Matt", "id": "2", "current_default": false},
{"label": "Jareth", "id": "3", "current_default": true}
]
```
{% endcode %}
Fields to be filled out in the form:
* **Value Field**: `id`
* **Label Field**: `label`
* **Default Selected Field**: `current_default`
### Workflow inputs
*Workflow inputs* in Rewst offer a flexible way to define specific inputs to a workflow via a form. This functionality allows you to handle various client cases and attributes dynamically. By understanding these concepts and utilizing the provided examples, you can create versatile and dynamic forms tailored to your specific needs.
Below are some key aspects of workflow inputs:
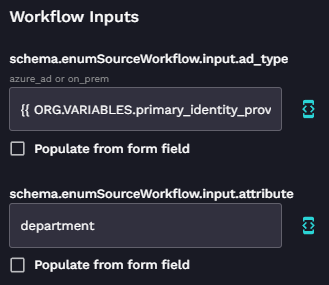
#### **Use org variables for client-specific workflows**
If you have a form used across multiple clients, each with distinct environments like Microsoft 365 or On-Prem, you can use an o[rg variable](https://docs.rewst.help/~/revisions/VmxzEdeNWvX54TqYxxOB/documentation/configuration/organization-variables) to dictate the source of the data.
For example, by employing `{{ ORG.VARIABLES.primary_identity_provider }}`, which is set per client as either `on_prem` or `azure_ad`, you can use the same form for both client cases. The form will be pulled from the relevant system.
#### **Hard-code attributes for efficiency**
Instead of creating separate workflows for various attributes such as department, userPrincipalName, or ID, you can use a single workflow with a hard-coded element. This approach takes your input and returns the desired property.
For example, **t**he attribute `department` can be hard-coded to allow a single workflow to handle different returned properties.
Here's a Jinja code snippet for achieving this:
{% code overflow="wrap" %}
```django
{%- set attribute_collection = [] -%}
{%- set my_attribute = CTX.attribute -%}
{%- set my_data = CTX.data|selectattr(my_attribute) -%}
{%- for user in my_data -%}
{%- if user[my_attribute] or false -%}
{%- set value=user[my_attribute] -%}
{%- set tmp = attribute_collection.append({my_attribute:value}) -%}
{%- endif -%}
{%- endfor -%}
{{- attribute_collection | unique(attribute=my_attribute) | sort(attribute=my_attribute) -}}
```
{% endcode %}
## Test a form: How to get a form's URL
Recall that you can access all forms in your form list in Rewst. Understanding how to test a form can sometimes be confusing due to its intrinsic link to a workflow. To get the Form URL for testing directly from a workflow:
1. Locate the [trigger](https://docs.rewst.help/~/revisions/VmxzEdeNWvX54TqYxxOB/documentation/automations/intro-to-triggers) on the workflow.
2. Click **View Form URLs**.
3. Select the desired organization's form from the list.
## Restrict form drop-downs
The onboarding form includes a number of fields to be filled out when onboarding new users. The default behavior of all the drop-down fields is to pull the list of options from the API. This is because the drop-down fields have **Dynamic Options** toggled on.
While this may work in many cases, there are scenarios where it makes sense to limit the number of options based on the customer segment you're working with. An example of this might be that you need to limit which email domains each customer sees. You may also want to limit which locations customers can choose from. In any case, you can set specific values for the `default_form` organization variables to use in your forms.
{% hint style="info" %}
The example below is specifically for the User Onboarding Form and workflow, as it is currently the most likely use case.
{% endhint %}
### Add an organization variable to a form
You can add default values for any of the form organization variables below:
{% hint style="info" %}
To view the form org variables table, [click here](https://docs.rewst.help/~/revisions/VmxzEdeNWvX54TqYxxOB/documentation/automations/forms/form-organizational-variables).
{% endhint %}
### Limit the email domains in the onboarding form
#### Add the org variable to an organization
1. Navigate to **Configuration > Organization Variables**.
2. Click **Add** at the top right.
3. Enter in the following for the new organization variable:
* **Name**: `form_default_email_domain`
* **Value**: `["email domain"]`
* **Category**: General
* **Organization**: Choose Your Organization
{% hint style="danger" %}
Any value you add to a variable must exist in the list that the form value is pulling from. An example of this would be that any email domain added as a default must exist in the list that is pulled from the Microsoft API.
{% endhint %}
Next, the variable can be added to the form field.
#### Add the org variable to the form field
1. Navigate to **Automations > Forms**.
2. Open the User Onboarding Form.
3. Click to open the settings for the **Email Domain Name** field.
4. Enter `true` in the **schema.enumSourceWorkflow\.input.force\_default** setting.
5. Enter `email_domain` in the **schema.enumSourceWorkflow\.input.choose\_variable** setting.
{% hint style="info" %}
You only need to add the latter half of the `form_default` variable when adding it to the **schema.enumSourceWorkflow\.input.choose\_variable** setting.
{% endhint %}
6. Click **Save**.
{% hint style="danger" %}
Make sure to set the org variable values for any company organization using the form. For example, say there are three company organizations that need to use the same form with a list of three domains to choose from. Each organization needs to have the variable added with the domain values set. If you only set the variable and values in Company 1, the other two Companies won't see any options to choose from.
{% endhint %}


.png?alt=media)

.png?alt=media)
