> For the complete documentation index, see [llms.txt](https://docs.rewst.help/llms.txt). Markdown versions of documentation pages are available by appending `.md` to page URLs; this page is available as [Markdown](https://docs.rewst.help/rewst-documentation/documentation/integrations/integration-guides/nable-integration-setup.md).
# N-able N-central integration
{% hint style="warning" %}
**N-central Required Version**
The new REST API endpoints are only available on N-central with a version of 2023.9 or above. Contact your N-able Representative to be upgraded where applicable.
If you’re new to integrations in Rewst, read through our introductory integration documentation [here](https://docs.rewst.help/documentation/integrations).
{% endhint %}
{% hint style="info" %}
If you’re new to integrations in Rewst, read through our introductory integration documentation [here](https://docs.rewst.help/documentation/integrations).
{% endhint %}
## What does the N-able N-central integration do?
Our N-able N-central integration allows MSPs to seamlessly interact with N-central's powerful RMM capabilities through Rewst, facilitating device management, task automation, and efficient operational workflows.
### Integration use cases
* Automatically synchronize device and customer data with your Rewst workflows.
* Execute and manage scheduled tasks directly from Rewst.
* Run automated Powershell scripts remotely to maintain and configure devices.
## Integration prerequisites
* N-able N-central version 2023.9 or above
* A dedicated API user created in N-able N-central
* A JSON web token from N-able N-central
* Powershell scripts configured for API access in N-able N-central
* Defined organization variables in Rewst
## Set up the N-able N-central integration
Set up steps in N-able N-central
1. Navigate to **Administration > User Management > Users**.\
\

2. Click **Create User** to create a new user specifically for API access. Name the user something that will easily identify its purpose.
3. Assign appropriate permissions required for your automations On the **Access Groups and Roles** tabs.
1. **Roles**: Create a role under **user management > roles** for a full API user. Name it administrator and set all the properties to manage. A reference sheet can be found here under [N-able API user permissions](https://documentation.n-able.com/N-central/userguide/Content/User_Management/Role%20Based%20Permissions/role_based_permissions_API_user.htm).
2. **Access Groups**: Set this to **All**.
4. Click the **User Details** tab. Click **User Information**.
5. Check **MFA Not Required** to on.\
\

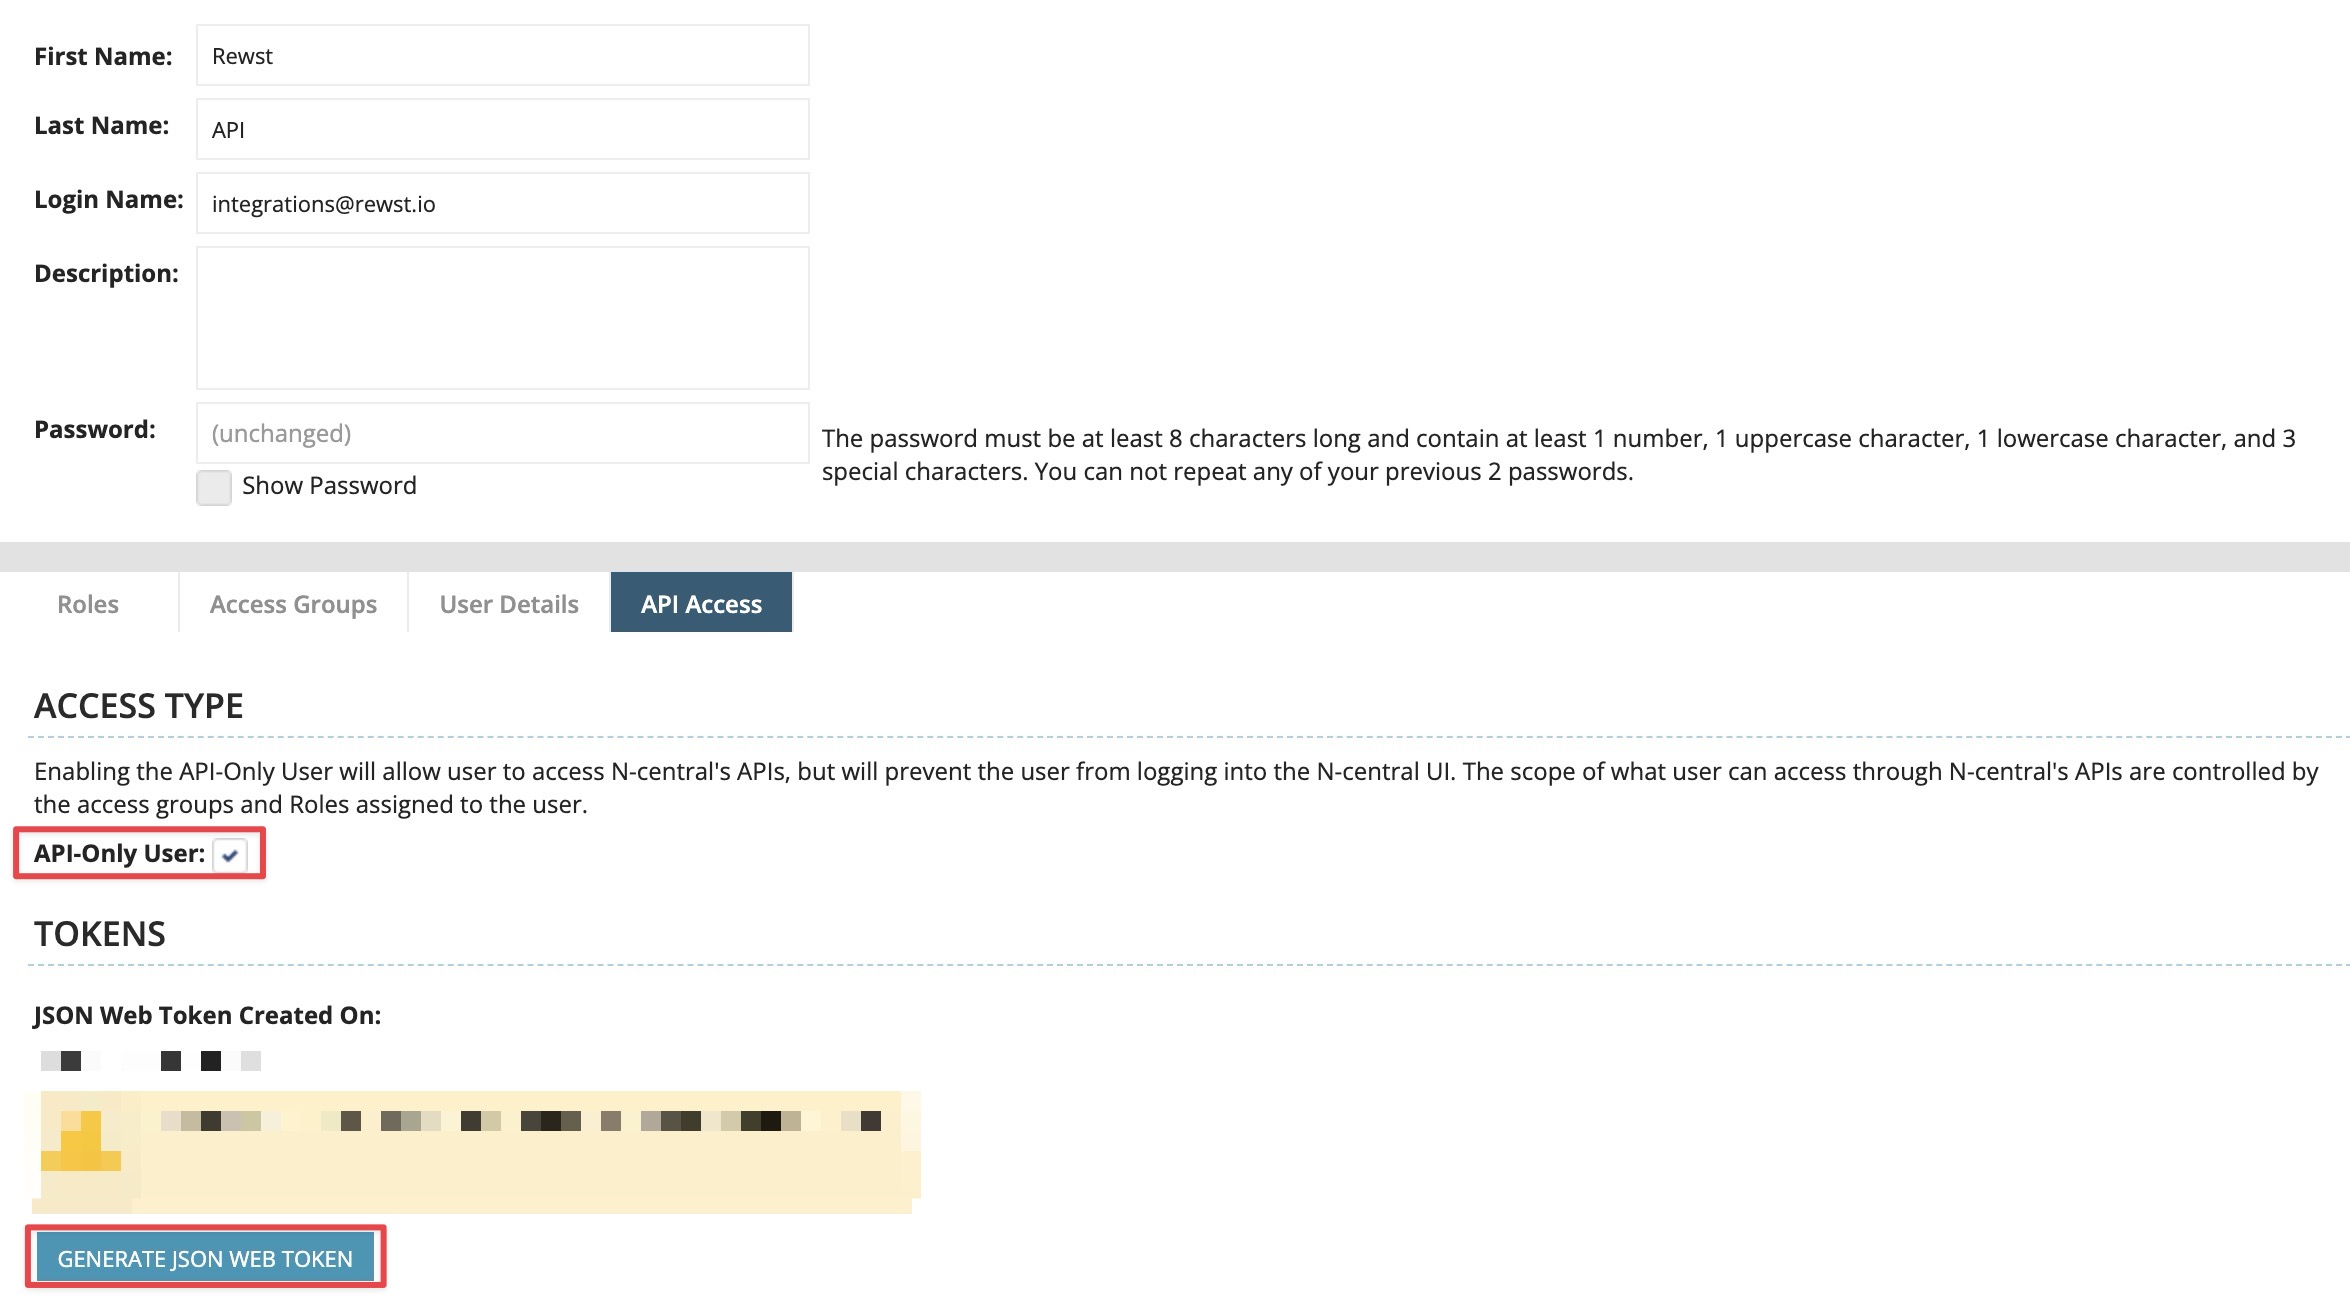
6. Click into the **API Access** tab.
7. Check **API Only User** to on.
8. Click **Save**.
9. Click **Generate JSON Web Token**.
10. Securely copy the generated API key. You’ll need this information for the next setup steps in Rewst.
### Set up steps in Rewst
1. Navigate to **Integrations** in the left side menu of your Rewst platform.
2. In the Integrations page, search for the `N-able N-central` integration.
3. Click on the integration tile to launch the configuration setup dialog.
4. Choose from either Production or Demo Mode for the setup of your integration:
1. **Production**: Connect with real credentials for live data
2. **Demo Mode**: Explore the integration with simulated mock responses
5. Click **Next: Configure and Authenticate**.
6. Select **+ Create New Credential from the Credential** drop-down selector.
7. Enter the information copied from N-able N-central into the relevant fields:
1. **Base URL -** N-able N-central hostname, for example `rewst.n-able.com`.
2. **API Key** - The JSON web token you previously generated
8. Click **Save Credential**.
9. Click **Next: Confirm**.
10. Click **Install Integration**. The integration will now appear in the top Connected section of your Integrations page.
11. Click on the installed integration. Scroll down to the Org Mappings section of the configuration page and complete organization mapping as needed.
### Run Powershell via RMM: Script setup
To run Powershell on devices via the RMM, you must create the script in your N-able repository and enable its access for use over the API, as per N-able security policies.
{% hint style="info" %}
To complete all the needed script setup steps in N-able N-central, you'll need to be assigned their Default Administrator Role.
{% endhint %}
1. Navigate to **Configuration > Scheduled Tasks > Script/Software Repository** in N-able.
2. Click **Add > Scripting**.\

3. Name the script `Rewst (Powershell)`.
4. Enter `Executes Powershell sent via API from Rewst` into the **Description** field.
5. Download the provided PS1 file from the bottom of this instruction section. Update your Powershell script's `$rewst_base_url` variable to match your Rewst Instance URL, using the table provided at the bottom of this section. You can identify which instance you are on by referencing the URL you use to access Rewst. The content of the **Command Line Parameters** field will automatically populate when you upload the file.\
Example of correct base URL: `https://engine.rewst.io/webhooks/custom/action`
6. Click **Browse** to upload the edited file into N-able N-central.
7. Click **Ok**.
8. Navigate to **Configuration > Scheduled Tasks > Script/Software Repository.**
9. Enable **API Access** for the script.
10. Note the **Repository ID**.
11. In Rewst, [create an organization variable](/rewst-documentation/documentation/automations/organization-variables.md#manually-add-a-new-organization-variable) named `nable_rewst_powershell_script_id` with the Repository ID as its value. Set this organization variable as default.
| Rewst URL | Base URL |
| ---------------- | ------------------- |
| app.rewst.io | engine.rewst.io |
| app.pdx.rewst.io | engine.pdx.rewst.io |
| app.eu.rewst.io | engine.eu.rewst.io |
| app.rewst.eu | engine.rewst.eu |
| app.rewst.asia | engine.rewst.asia |
{% file src="/files/rbZFApF3Ne9Uq1zFlxWe" %}
{% hint style="info" %}
The org variable is only currently required as there is no way to search for a script with the existing API endpoints.
{% endhint %}
## Use custom PowerShell scripts with your RMM integration
This brand of RMM allows PowerShell scripts to be passed via API. The RMM runs your script on an endpoint, and Rewst has no way to see the result, so the script has to POST back to a Rewst URL. PowerShell only runs on the RMM's side, never inside Rewst. To report the script back to Rewst, you'll need to add a wait for [webhook callback node](https://docs.rewst.help/rewst-documentation/documentation/integrations/integration-guides/pages/27ztelCxRCWn8lmMEtvh#wait-for-webhook-tasks.wait_for_webhook). This will generate a unique callback URL and pause until an external system calls it or the timeout expires.
If using custom scripts, you'll need to add this to bottom of your existing script to ensure the call back to Rewst is made. The `$resumeUrl` / `$resumeToken` are on the node's URL Ready output, and the workflow passes both into the RMM script as parameters.
```
$postData = $PS_Results | ConvertTo-Json
Invoke-RestMethod -Method 'Post' -Uri $resumeUrl -Body $postData `
-ContentType 'application/json; charset=utf-8' `
-Headers @{ 'X-Rewst-Token' = $resumeToken }
```
Timeout is required and bounded: 60 seconds minimum, 604800 maximum, which is 7 days. You can control the response your script sees. The `responseStatus` defaults to 200, and there's an optional `responseBody`. This is useful if the RMM cares what came back.
{% hint style="success" %}
Got an idea for a new Integration? Rewst is constantly adding new integrations to our integrations page. Submit your idea or upvote existing ideas here in our [Canny feedback collector](https://rewst.canny.io/integrations).
{% endhint %}
## Current limitations
There is currently no way to identify a domain controller via the N-able REST API. You must manually set the hostname of the preferred DC. Do this using the organization variable form that was discussed during your onboarding. The end result will be an organizational variable called **preferred\_domain\_controller** and a value of the hostname of that client's DC.
---
# Agent Instructions
This documentation is published with GitBook. GitBook is the documentation platform designed so that both humans and AI agents can read, navigate, and reason over technical content effectively. Learn more at gitbook.com.
## Querying This Documentation
If you need additional information that is not directly available in this page, you can query the documentation by asking a question.
Perform an HTTP GET request on the following URL with the `ask` and `goal` query parameters:
```
GET https://docs.rewst.help/rewst-documentation/documentation/integrations/integration-guides/nable-integration-setup.md?ask=&goal=
```
`ask` is the immediate question: it should be specific, self-contained, and written in natural language.
`goal` is what the user is ultimately trying to achieve, the reason they need the answer. Sharing it helps GitBook give you a better, more relevant answer. A goal is most helpful when it describes the outcome the user wants rather than restating the question. For example, with `ask=how do I create an API token`, a goal like `automate deployments from our CI pipeline` lets GitBook tailor the answer to that use case.
The response will contain a direct answer to the question and relevant excerpts and sources from the documentation.
Use this mechanism when the answer is not explicitly present in the current page, you need clarification or additional context, or you want to retrieve related documentation sections.