> For the complete documentation index, see [llms.txt](https://docs.rewst.help/llms.txt). Markdown versions of documentation pages are available by appending `.md` to page URLs; this page is available as [Markdown](https://docs.rewst.help/rewst-documentation/documentation/integrations/integration-guides/it-glue-integration-setup.md).
# IT Glue integration
{% hint style="warning" %}
IT Glue's API access is limited to users of the legacy **Classic** (pre 2018) and **Enterprise** level plans only. See **\[yourdomain].itglue.com/account/plan** for details on your organization's plan and usage.
For more information on IT Glue's plans and pricing review the [IT Glue pricing page](https://www.itglue.com/pricing/).
{% endhint %}
{% hint style="info" %}
If you’re new to integrations in Rewst, read through our introductory integration documentation [here](https://docs.rewst.help/documentation/integrations).
{% endhint %}
## What does the IT Glue integration do?
Rewst's IT Glue integration brings powerful documentation capabilities to your applications, enhancing IT knowledge management and streamlining workflows. Seamlessly access and collaborate on IT Glue's documentation repository, gaining centralized access to critical information, configurations, and processes. Improve efficiency, ensure consistency, and enhance IT service delivery. Leverage the collective knowledge and expertise stored in IT Glue to troubleshoot issues, onboard new team members, and deliver exceptional IT support.
## Set up the IT Glue integration
### Password access
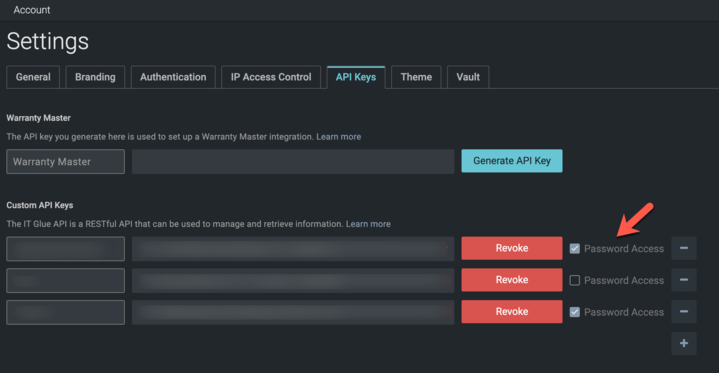
Rewst requires the **Password Access** checkbox to be enabled on the API Keys screen in ITGlue Account Settings.
Ensure that this setting is checked before attempting integration setup
### Set up steps in IT Glue
IT Glue's most up-to-date information for how to generate an API key can be found [here](https://help.itglue.kaseya.com/help/Content/1-admin/it-glue-api/getting-started-with-the-it-glue-api.html?cshid=1038).
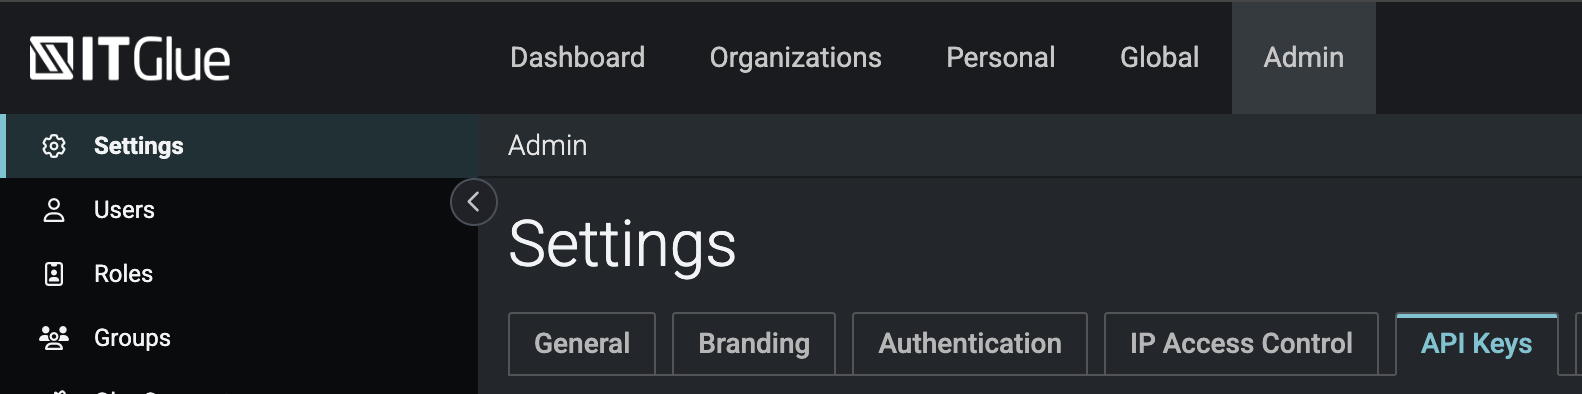
1. Navigate to **Admin > Settings** in your IT Glue application.
2. Click the **API keys** tab.
3. Scroll to bottom and click **+** on the right side.
4. Enter a **name** for the API key.
5. Click **Generate API key**.
6. Check the **Password Access** box.
7. Copy and Save the API key. Note that you won't be able to view the API key again once it has been generated.
### Set up steps in Rewst
1. Navigate to **Integrations** in the left side menu of your Rewst platform.
2. In the Integrations page, search for the `IT Glue` integration.
3. Click on the integration tile to launch the configuration setup dialog.
4. Choose from either Production or Demo Mode for the setup of your integration:
1. **Production**: Connect with real credentials for live data
2. **Demo Mode**: Explore the integration with simulated mock responses
5. Click **Next: Configure and Authenticate**.
6. Select **+ Create New Credential from the Credential** drop-down selector.
7. Enter the information copied from IT Glue into the relevant fields:
1. **API Key**
2. **Base URL**
8. Click **Save Credential**.
9. Click **Next: Confirm**.
10. Click **Install Integration**. The integration will now appear in the top Connected section of your Integrations page.
11. Click on the installed integration. Scroll down to the Org Mappings section of the configuration page and complete organization mapping as needed.
## Troubleshoot the IT Glue integration
### Forbidden errors
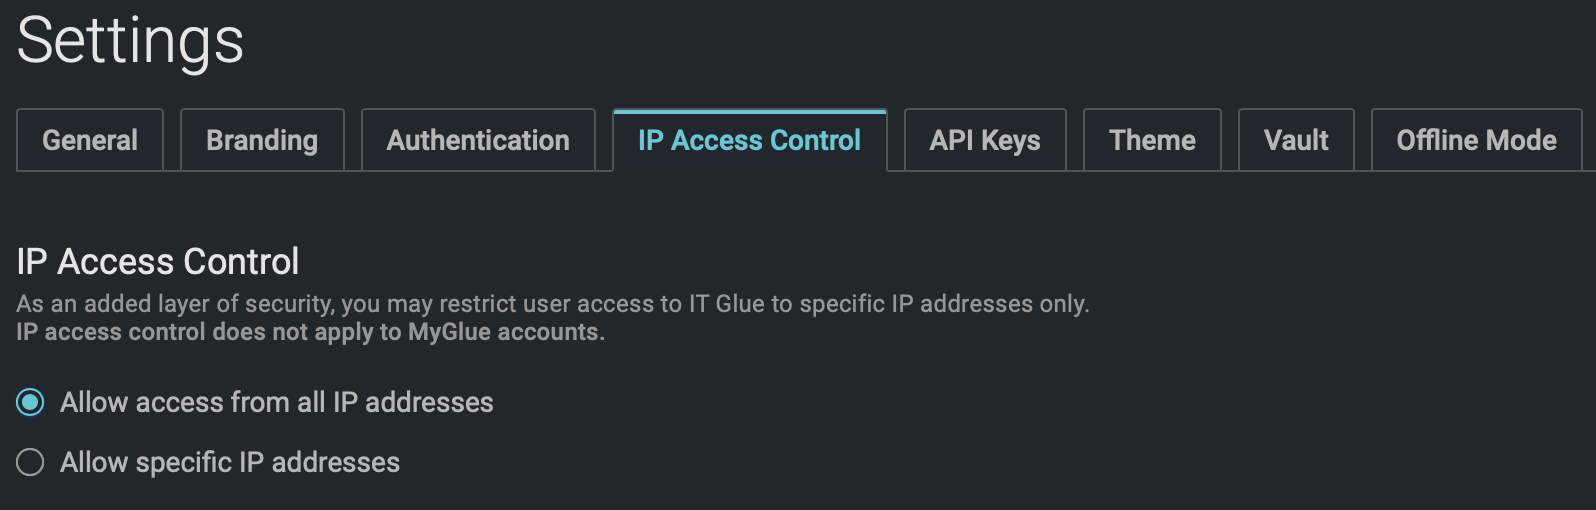
If you've selected `Allow specific IP addresses` in IT Glue rather than `Allow access from all IP addresses`, you will need to add the [Incoming and outgoing domains and IPs](/rewst-documentation/security/security-policy.md#rewst-outgoing-ip-address) into the `IP Access Control` within IT Glue.
Here's how you can do it:
1. Navigate to the IP Access Control settings within IT Glue.
2. Add [Rewst's IP address](/rewst-documentation/security/security-policy.md#rewst-outgoing-ip-address) to the list of allowed IP addresses.
After adding Rewst's IP address, the forbidden error should be resolved and you should be able to successfully set up the IT Glue integration.
For more information, check [IT Glue's own documentation](https://api.itglue.com/developer/).
## Add Rewst flexible assets to sidebar in IT Glue
{% hint style="warning" %}
These steps can only be performed from an IT Glue admin account.
{% endhint %}
If you have created flexible assets in Rewst, and want to add them to your sidebar in IT Glue:
1. Log in to your IT Glue admin account.
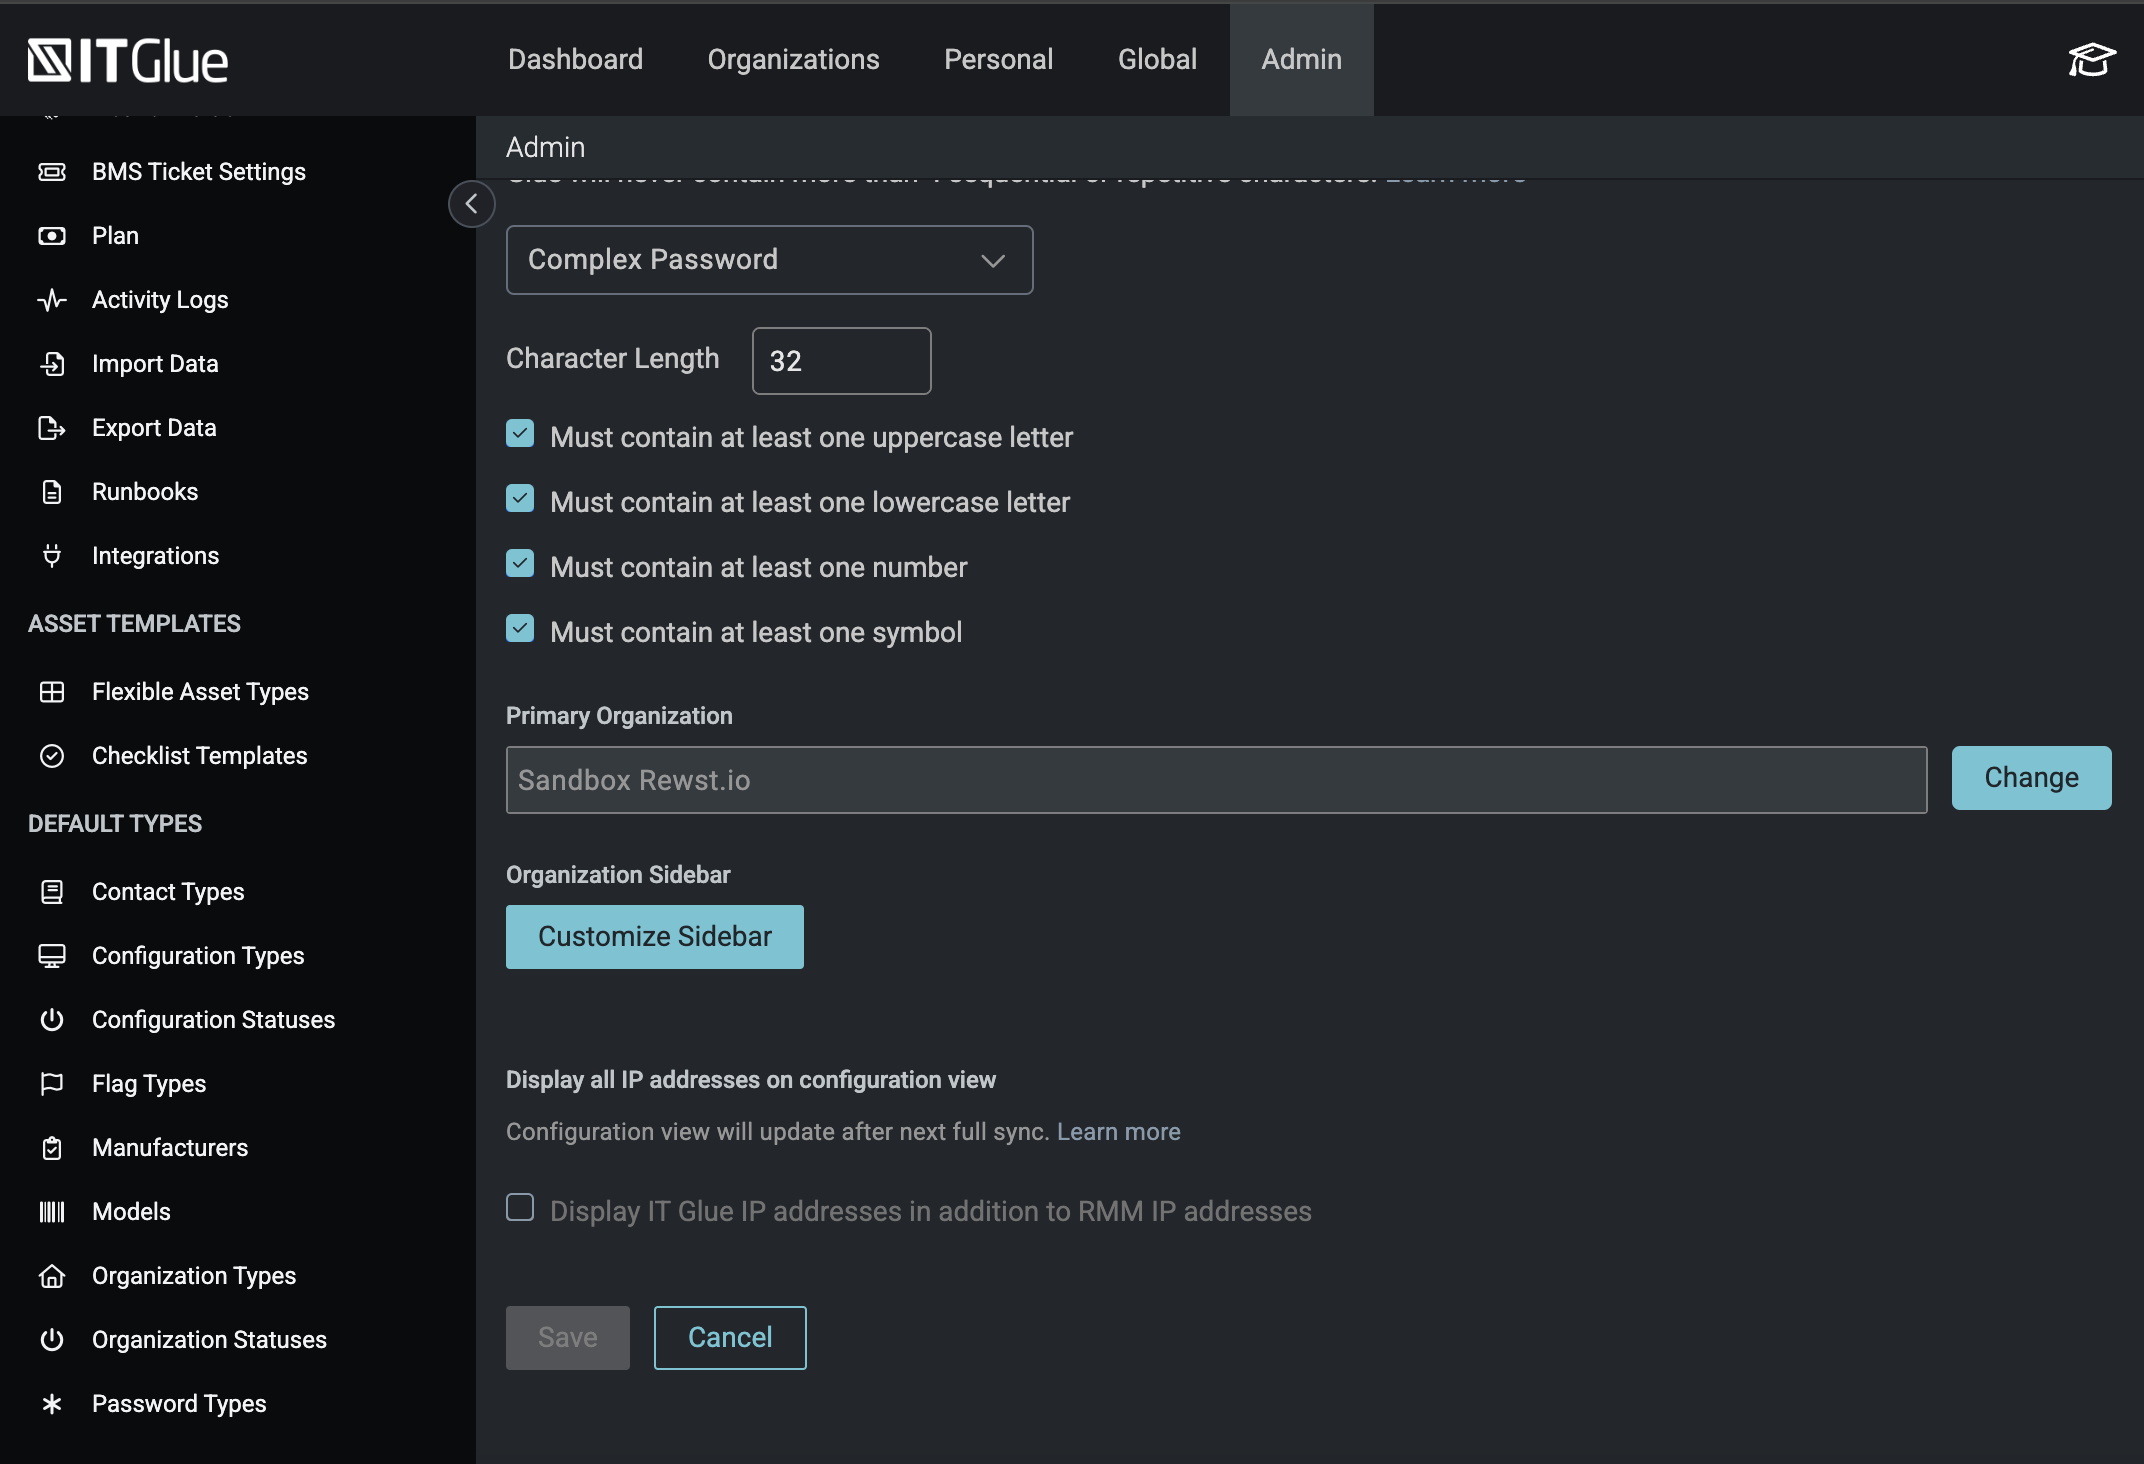
2. Click the **Admin** tab in the top menu.
3. Scroll down and click **Customize Sidebar.**\
4. Choose your assets to add to the sidebar under **Flexible Assets**.
5. When finished, click the green **Save** button. Your sidebar should be updated. This section is also where you may reset the sidebar to default, if you wish to remove Rewst's flexible assets. \
\

{% hint style="success" %}
Got an idea for a new Integration? Rewst is constantly adding new integrations to our integrations page. Submit your idea or upvote existing ideas here in our [Canny feedback collector](https://rewst.canny.io/integrations).
{% endhint %}
---
# Agent Instructions
This documentation is published with GitBook. GitBook is the documentation platform designed so that both humans and AI agents can read, navigate, and reason over technical content effectively. Learn more at gitbook.com.
## Querying This Documentation
If you need additional information that is not directly available in this page, you can query the documentation by asking a question.
Perform an HTTP GET request on the following URL with the `ask` and `goal` query parameters:
```
GET https://docs.rewst.help/rewst-documentation/documentation/integrations/integration-guides/it-glue-integration-setup.md?ask=&goal=
```
`ask` is the immediate question: it should be specific, self-contained, and written in natural language.
`goal` is what the user is ultimately trying to achieve, the reason they need the answer. Sharing it helps GitBook give you a better, more relevant answer. A goal is most helpful when it describes the outcome the user wants rather than restating the question. For example, with `ask=how do I create an API token`, a goal like `automate deployments from our CI pipeline` lets GitBook tailor the answer to that use case.
The response will contain a direct answer to the question and relevant excerpts and sources from the documentation.
Use this mechanism when the answer is not explicitly present in the current page, you need clarification or additional context, or you want to retrieve related documentation sections.