> For the complete documentation index, see [llms.txt](https://docs.rewst.help/llms.txt). Markdown versions of documentation pages are available by appending `.md` to page URLs; this page is available as [Markdown](https://docs.rewst.help/rewst-documentation/documentation/integrations/integration-guides/connectwise-integration-setup.md).

# ConnectWise PSA integration

{% hint style="info" %}
Note that ConnectWise PSA was previously known as ConnectWise Manage.

If you’re new to integrations in Rewst, read through our introductory integration documentation [here](https://docs.rewst.help/documentation/integrations).
{% endhint %}

## What does the ConnectWise PSA integration do?

Our ConnectWise PSA integration enables the automation of PSA tasks. Use the ConnectWise PSA API within Rewst workflows to perform actions such as managing agreements, contacts, and tickets.

### Why use the ConnectWise PSA integration?

Here’s just a taste of what you can automate with relevant Crates, after you've set up your ConnectWise PSA integration:

* Add your child organizations, also known as customers, to Rewst.
* User onboarding and offboarding
* Categorize tickets using OpenAI

## Integration prerequisites

Rewst has a number of tasks that can be performed using the ConnectWise API, all of which require different permissions. You can review the [ConnectWise PSA Security Roles Matrix](https://developer.connectwise.com/@api/deki/files/422/Security_Roles_Matrix_11132017.xlsx?revision=1) for more information.

{% hint style="info" %}
You'll need an active ConnectWise Developer account to access the above URL.
{% endhint %}

## Set up the ConnectWise PSA integration

### Setup steps in ConnectWise

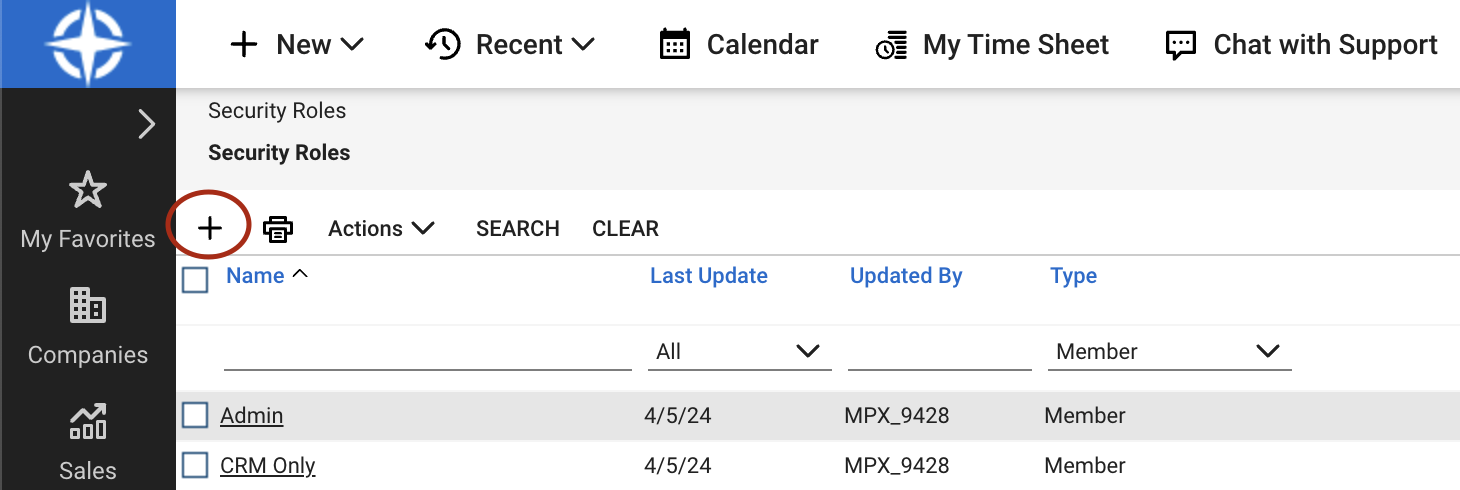
1. Create a security role in ConnectWise PSA
   1. Navigate to **System > Security Roles**.
   2. Click **+** in the top left of your screen.<br>

      <figure><img src="https://content.gitbook.com/content/h0G0em3PH6aDfPoI5XpN/blobs/JmkN86pH9LG7EbOvzRC4/Screenshot%202025-06-16%20at%2012.53.20%E2%80%AFPM.png" alt="" width="375"><figcaption></figcaption></figure>
   3. Name the security Role `Rewst API`.
   4. Click **save**.
   5. Set your permissions as per the [#permission-requirements-for-connectwise-psa-integration](#permission-requirements-for-connectwise-psa-integration "mention") section of this document.
2. Create an API account.
   1. This can be done by following [ConnectWise's own instructions](https://developer.connectwise.com/Special:Userlogin?returntotitle=Products%2FManage%2FDeveloper_Guide%2FAuthentication#tab=login).
   2. Note that you'll need to be signed in to ConnectWise PSA to view the documentation.
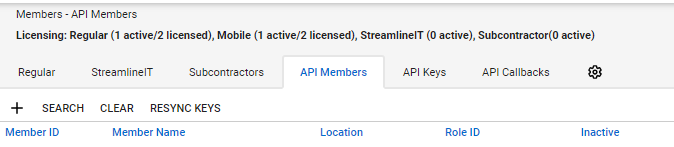
3. Create an API member.
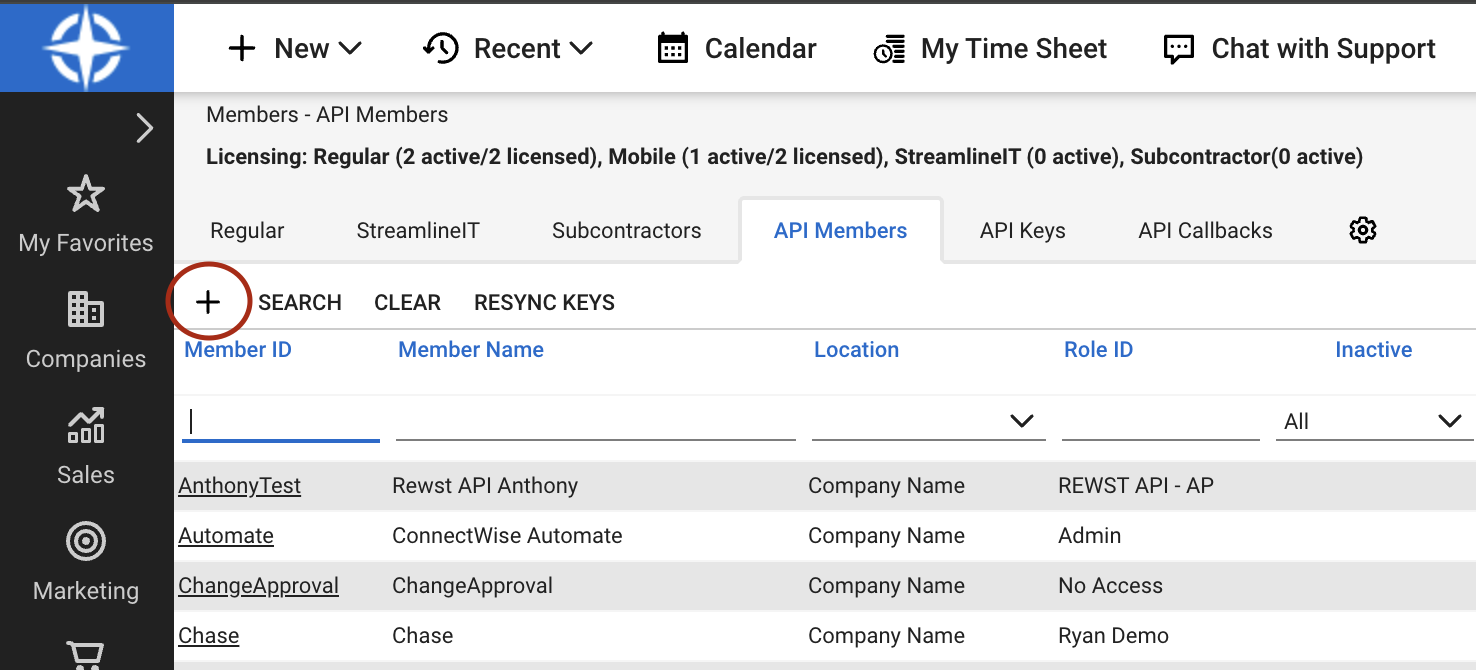
   1. Navigate to **System > Members > API Members**.
   2. Click **+** to create a new API member.<br>

      <figure><img src="https://content.gitbook.com/content/h0G0em3PH6aDfPoI5XpN/blobs/ZaFfVpdHRCv1deEqXaZw/Screenshot%202025-06-16%20at%201.32.24%E2%80%AFPM.png" alt="" width="375"><figcaption></figcaption></figure>
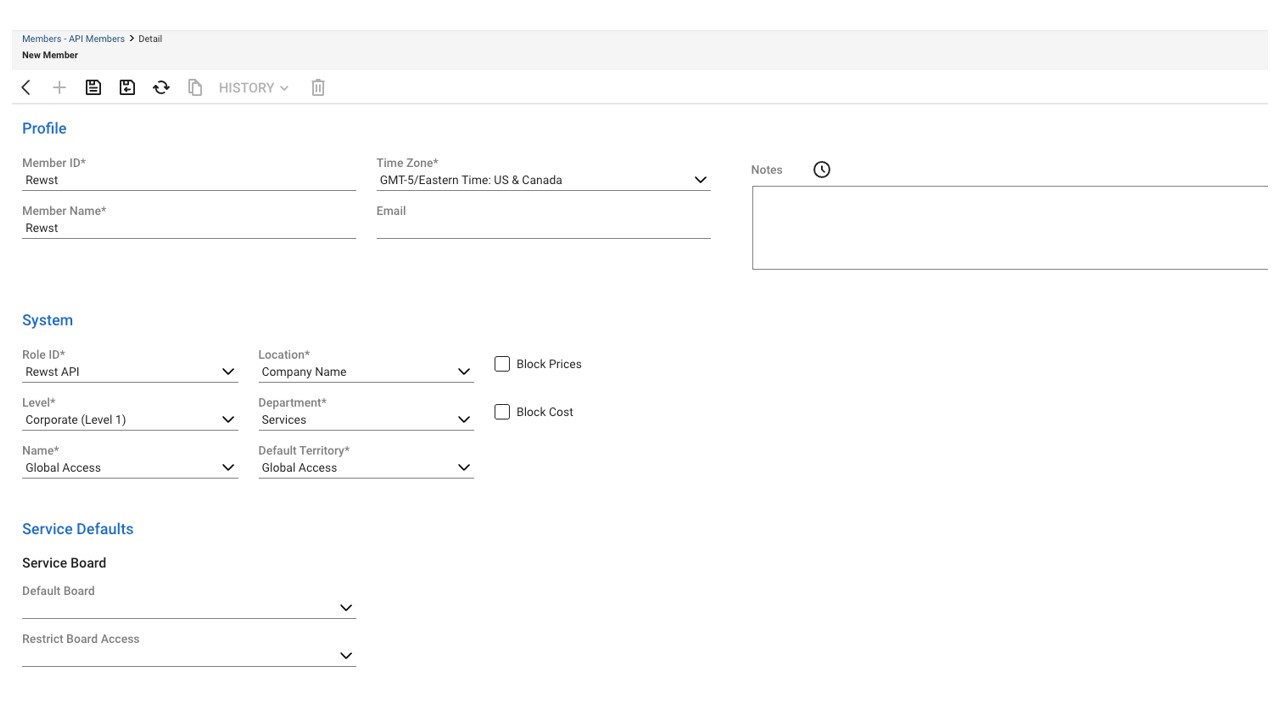
   3. Enter a **Member ID** and **Member Name**. We suggest naming each of these `Rewst`.
   4. Select **Rewst API** as your **Role ID**.
   5. Select your highest **Level**, such as Corporate (Level 1)*.*
   6. Select a **Location**, **Department**, **Name**, and **Default Territory**, as per your company guidelines.
   7. Click **Save**.
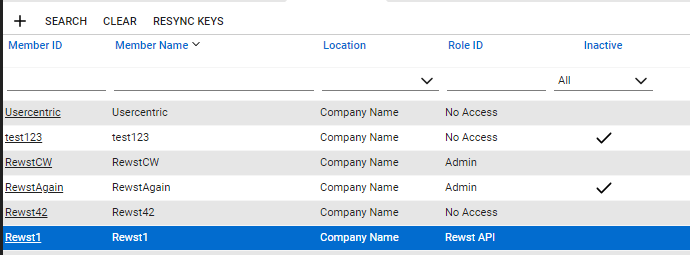
   8. Click on the **Rewst API member**.
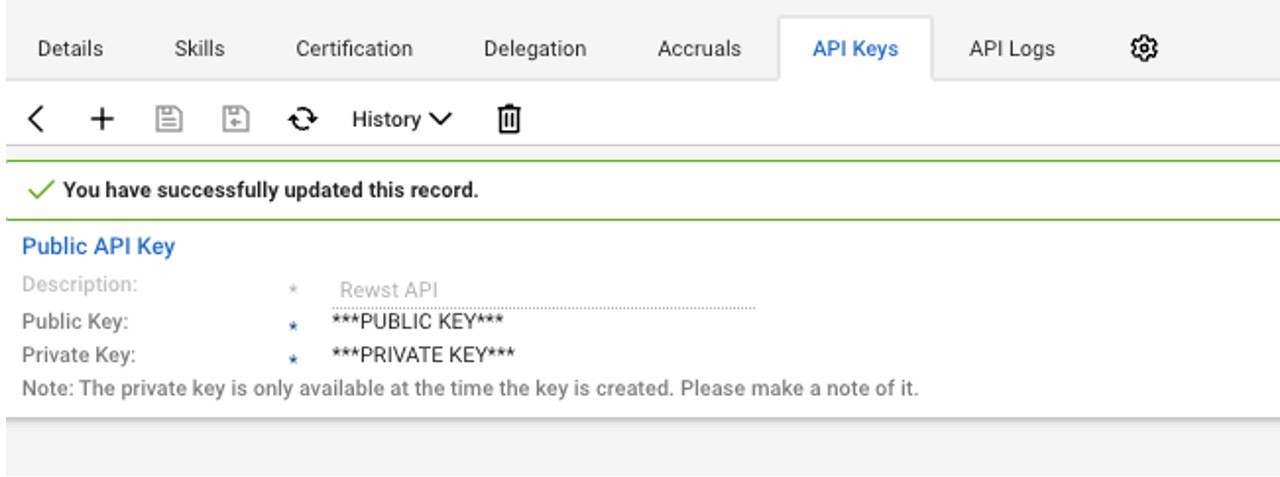
   9. Click **API Keys** **+**.
   10. Add a new API Key.
   11. Add `Rewst API` as the **Description**.
   12. Click **Save**.
   13. Copy and save the public and private key in a secure location. You'll need these to move on to the rest of the setup steps in Rewst.

<figure><img src="https://content.gitbook.com/content/h0G0em3PH6aDfPoI5XpN/blobs/UFBM9JAiWFjOGILtzgiL/cwm-api-member.jpg" alt=""><figcaption><p>Creating an API Member in ConnectWise PSA</p></figcaption></figure>

<figure><img src="https://content.gitbook.com/content/h0G0em3PH6aDfPoI5XpN/blobs/to6V2zFpDDDLLHAfdRru/public-api-key.jpg" alt=""><figcaption><p>Public and Private Key</p></figcaption></figure>

### Set up steps in Rewst

1. Navigate to Integrations in the left side menu of your Rewst platform.
2. Search for `ConnectWise PSA` in the integrations page.
3. Click on the integration tile to launch the configuration setup dialog.
4. Choose from either Production or Demo Mode for the setup of your integration:
   1. Production: Connect with real credentials for live data
   2. Demo Mode: Explore the integration with simulated mock responses
5. Click **Next: Configure and Authenticate**.
6. Select **+ Create New Credential** from the Credential drop-down selector.
7. Enter the information copied from ConnectWise into the relevant fields:
   1. The **Hostname** for ConnectWise PSA
   2. The **Company ID** used when logging into ConnectWise PSA
   3. The **Public API Key**
   4. The **Private API Key**
8. Optionally, change the **Parameters** menu's conditions to filter what companies are returned by the API.
9. Click **Save Credential**.
10. Click **Next: Confirm**.
11. Click **Install Integration**. The integration will now appear in the top Connected section of your Integrations page.&#x20;
12. Click on the installed integration. Scroll down to the Org Mappings section of the configuration page and complete organization mapping as needed.&#x20;

## Triggers for ConnectWise PSA integration

<details>

<summary>Table of triggers</summary>

| Trigger type name            | Type    | Description                                                                     |
| ---------------------------- | ------- | ------------------------------------------------------------------------------- |
| Activity Record Saved        | Webhook | Receive notifications when an Activity record is saved in ConnectWise PSA       |
| Agreement Record Saved       | Webhook | Receive notifications when an Agreement record is saved in ConnectWise PSA      |
| Company Record Saved         | Webhook | Receive notifications when a Company record is saved in ConnectWise PSA         |
| Configuration Record Saved   | Webhook | Receive notifications when a Configuration record is saved in ConnectWise PSA   |
| Contact Record Saved         | Webhook | Receive notifications when a Contact record is saved in ConnectWise PSA         |
| Expense Record Saved         | Webhook | Receive notifications when an Expense record is saved in ConnectWise PSA        |
| Invoice Record Saved         | Webhook | Receive notifications when an Invoice record is saved in ConnectWise PSA        |
| Opportunity Record Saved     | Webhook | Receive notifications when an Opportunity record is saved in ConnectWise PSA    |
| Product Catalog Record Saved | Webhook | Receive notifications when a Product Catalog record is saved in ConnectWise PSA |
| Project Record Saved         | Webhook | Receive notifications when a Project record is saved in ConnectWise PSA         |
| Purchase Order Record Saved  | Webhook | Receive notifications when a Purchase Order record is saved in ConnectWise PSA  |
| Schedule Entry Record Saved  | Webhook | Receive notifications when a Schedule Entry record is saved in ConnectWise PSA  |
| Ticket Record Saved          | Webhook | Receive notifications when a Ticket record is saved in ConnectWise PSA          |
| Time Entry Record Saved      | Webhook | Receive notifications when a Time Entry record is saved in ConnectWise PSA      |

</details>

## ConnectWise PSA pod configuration

{% hint style="warning" %}
Pod authorization

*Pods* are a way to customize each of your screens in ConnectWise with relevant information that is often out of the view or displayed elsewhere in ConnectWise. Note that pods do not allow the use of the fat client due to authorization pass-through issues. This means that you can use the web client to access pods.
{% endhint %}

During pod configuration, you'll need to update your Rewst base URL to match your geographic Rewst instance. This will vary depending on which Rewst instance you are on. Identify your instance by the URL you use to access Rewst. Please use the following table as a guide to identify your Rewst base URL

| <p><br>Rewst URL</p> | Base URL           |
| -------------------- | ------------------ |
| app.rewst.io         | engine.rewst.io    |
| app.eu.rewst.io      | engine.eu.rewst.io |
| app.rewst.eu         | engine.rewst.eu    |
| app.rewst.asia       | engine.rewst.asia  |

### Configure ConnectWise pods <a href="#configure-connectwise-pods" id="configure-connectwise-pods"></a>

1. Login to ConnectWise PSA as a user that has access to the setup tables. This is likely an admin account.
2. Click **System** on the bottom left of the ConnectWise PSA UI.
3. Click the **Setup Tables** menu that appears.
4. Enter `*api` in the table filter. Your returned result should be **Manage Hosted API**.
5. Click **Add** and use the below settings:
   1. **Description** - Enter **Rewst**
   2. **Screen** - For our example, we use **Service Tickets**
   3. **Origin** - `<rewst_url>` Note that you'll need to update this origin URL to match your Rewst instance. Determine your instance by referencing the instance table above.
   4. **URL** - `https://<rewst_url>/organizations/<org_id>/integrations/embed/ticket/[cw_id]` Note that you'll need to update this URL to match your Rewst instance. Determine your instance by referencing the included instance table. You'll also need to add your own `org_id`to the URL. This can be obtained by going to your Rewst platform, looking at the URL, locating the org id between the / marks, and pasting it into the URL. `[cw_id]`should be left as-is.
6. Select **Pod**.

{% hint style="warning" %}
Update the URL

You will need to add your own `rewst_url` and `org_id` to the URL above. Your Org ID can be obtained by going to Rewst and looking at the URL. `[cw_id]`should be left as-is.
{% endhint %}

### Add pods to tickets

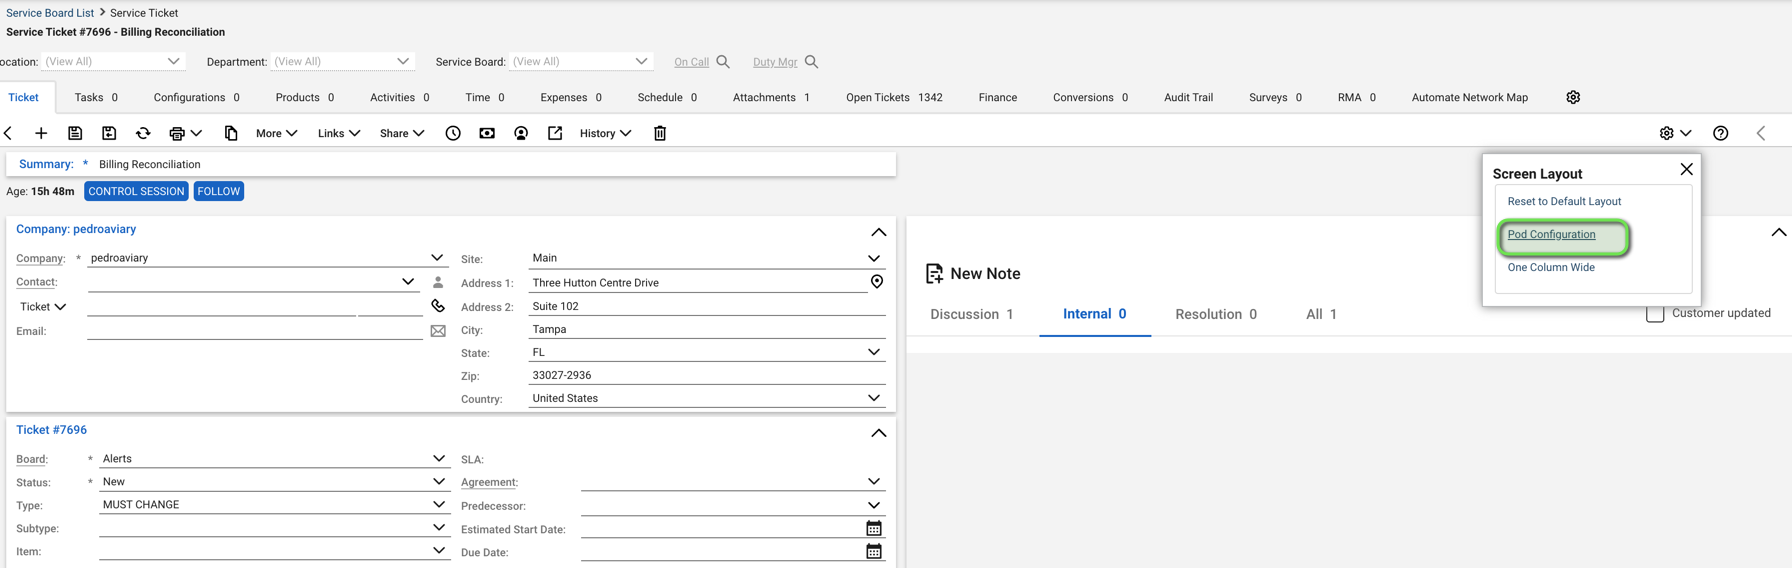
1. Click the **Settings** icon in the top right corner of your screen.
2. Select **Pod Configuration**.

<figure><img src="https://content.gitbook.com/content/h0G0em3PH6aDfPoI5XpN/blobs/3RUau2wT6XOL1aMXuoX5/cwm-pod-config.png" alt=""><figcaption><p>Selecting the Settings Icon</p></figcaption></figure>

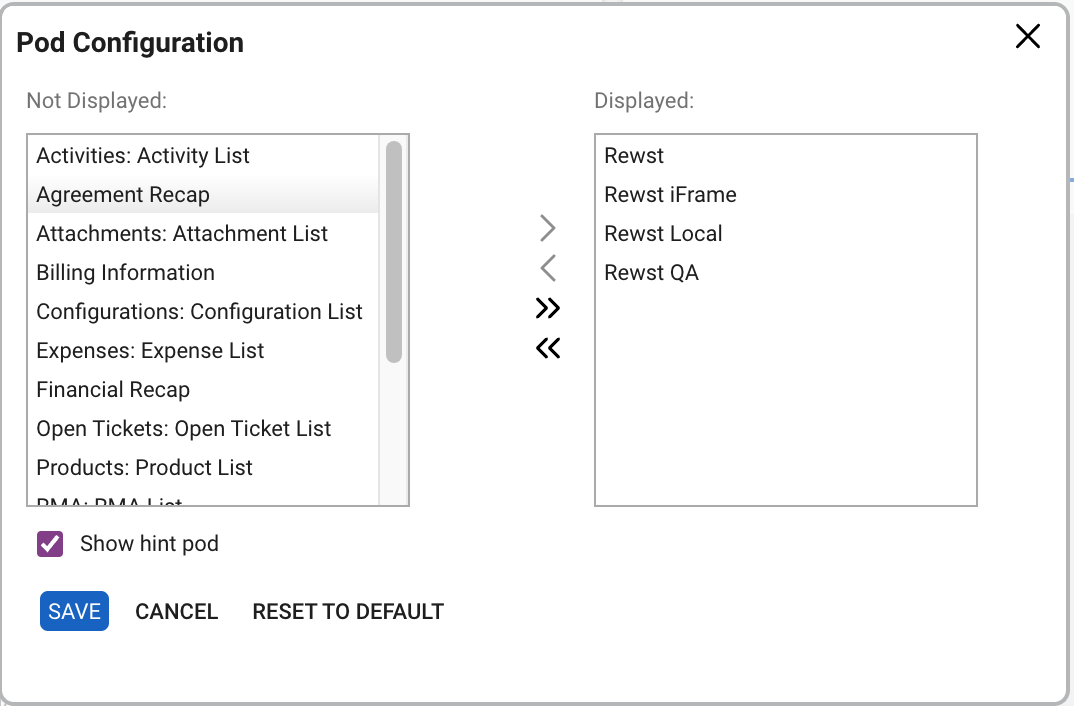
3. **Move** the Rewst pods to the **Displayed** table.

<figure><img src="https://content.gitbook.com/content/h0G0em3PH6aDfPoI5XpN/blobs/fOARoilRCKOIF3QF0dko/cwm-pod-configuration-window.png" alt=""><figcaption><p>Adding Rewst Configured Pods</p></figcaption></figure>

{% hint style="danger" %}
**Firefox dynamic state partitioning**

An issue arises with Firefox's Dynamic State Partitioning where the default `network.cookie.cookieBehavior` value of 5 rejects (known) trackers and partitions third-party storage, hindering the authentication process and causing a logged GraphQL error. This issue also occurs with embedded forms.

Firefox users must set `network.cookie.cookieBehavior` to 4 for successful pod authentication.

Consult the official Firefox documentation for more information: <https://developer.mozilla.org/en-US/docs/Web/Privacy/State_Partitioning#disable_dynamic_state_partitioning>.
{% endhint %}

You'll have a workflow called `[Rewst Master v3] Pods: Technician Toolbox` within your organization.

### Re-run a pod from a ticket

Imagine you have a ticket that has had its associated pod workflow execution expire or fail for one reason or another. If you attempt to view the pod in the ticket, you'll see something along the lines of `No pending tasks`.

<figure><img src="https://github.com/RewstApp/docs.rewst.help/assets/121902974/7ce5ce24-e338-41a2-99d2-9db4effd218a" alt=""><figcaption></figcaption></figure>

To execute a new instance of the pod, click on the **Links** dropdown in the ticket and choose **Rewst - Start Pod on this Ticket**.

<figure><img src="https://github.com/RewstApp/docs.rewst.help/assets/121902974/058d6794-48ba-4f7d-b5ba-d15b2f295b87" alt="" width="375"><figcaption></figcaption></figure>

After you have used this button, a web page will open and close. This will send a request to the Live Link trigger and start a new execution for that ticket. Allow some time to pass for the ticket to update. You should see the pod populate once the execution has gone through.

<figure><img src="https://github.com/RewstApp/docs.rewst.help/assets/121902974/a1e209d6-c432-44aa-9785-14d24f47410f" alt=""><figcaption></figcaption></figure>

## Permission requirements for ConnectWise PSA integration

{% hint style="info" %}
Our listed ConnectWise PSA permission requirements are what is needed for Rewst's Crates to run. Other API actions that you may wish to use in custom-built workflows may require additional permissions. For questions about what permissions would be required to achieve a specific goal, ask the Rewst Agent.
{% endhint %}

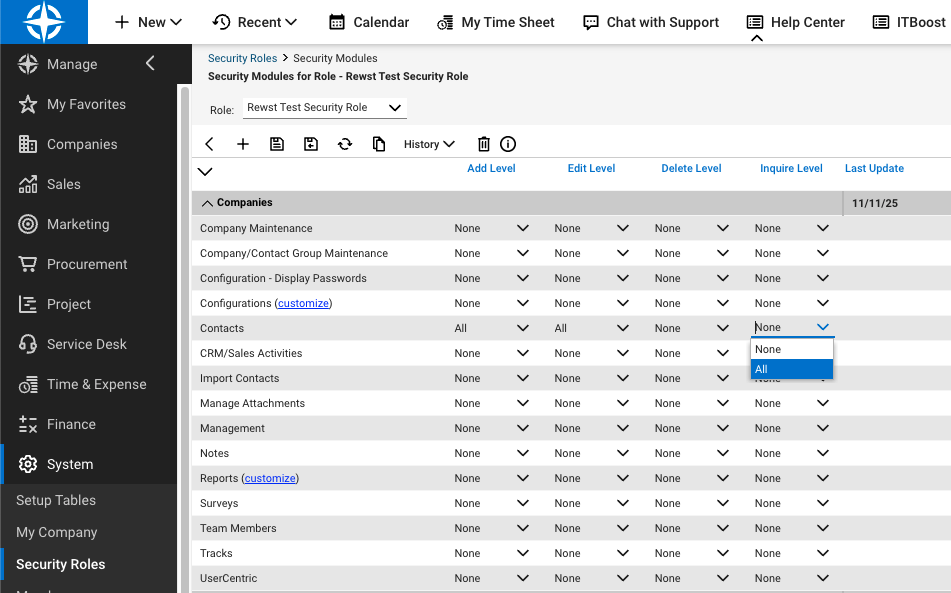
Update any of the below permissions scopes in ConnectWise PSA by doing the following in ConnectWise PSA:

1. Click **>** in the left side menu.
2. Navigate to **System > Security Roles**.
3. Click **+**.
4. Enter the name of your security role.
5. Click Save.
6. A new set of accordion menus will appear. Click to expand each as it corresponds to your needed permission for Rewst.
7. Click ⌄ under the column for the required level of permission. Change the permission level from **None** to whichever option is indicated in our documentation.
8. When all desired permissions are updated, click **Save**.

<figure><img src="https://content.gitbook.com/content/h0G0em3PH6aDfPoI5XpN/blobs/LO66YrRqhqaePfs5JabT/Screenshot%202025-11-11%20at%204.14.57%E2%80%AFPM.png" alt="A white screen with grey and blue elements, and black text. Center screen is a table with down arrows, which reveal menus of options when clicked. The table is for setting permission levels in ConnectWise PSA."><figcaption><p>Match the line item under each accordion menu with the scope header at the top of the page to find where to make your adjustment.</p></figcaption></figure>

Click to expand and view your relevant permission scopes.

<details>

<summary>Authentication requirements</summary>

To initiate the successful authentication of the ConnectWise PSA integration with Rewst, and pull back the list of companies you want to associate, the following permission scopes are needed:

System

* Member Maintenance: Set **Inquire** to **All**

Companies

* Company Maintenance: Set **Inquire** to **All**

{% hint style="danger" %}
If you are seeing a 403 Forbidden error when running workflows, this is due to incorrect permissions. Ensure that the above authentication requirements are complete to resolve this error.
{% endhint %}

</details>

<details>

<summary>Additional action requirements</summary>

In addition to the above that’s required for authentication, there are several more actions the ConnectWise PSA integration is capable of taking within Rewst. To use them all, you’ll need the following additional security roles configured for this account:

**Companies**

* **Configurations**: Set **Add**, **Edit**, **Inquire** to **All**
* **Contacts**: Set **Add**, **Edit**, **Inquire** to **All**
* **Manage Attachments**: Set **Add**, **Edit**, and **Delete** to **My**, **Inquire** to **All**
* **Team Members**: Set **Inquire** to **All**

**Finance**

* **Agreements**: Set **Inquire** to **All**
* **Billing View Time**: Set **Inquire** to **All**
  * Required for adding billable time to tickets
* **Billing View Time**: Set **Edit** to **All**
  * Required for adding billable time to tickets

**Project**

* **Project Ticket**: Set **Add**, **Edit**, **Inquire** to **All**
* **Project Ticket - Dependancies**: Set **Add**, **Edit**, **Inquire** to **All**
* **Close Project Tickets**: Set **Edit**, **Inquire** to **All**

**Service Desk**

* **Service Tickets**: Set **Add**, **Edit**, **Inquire** to **All**
* **Service Ticket – Dependencies**: Set **Add**, **Edit**, **Inquire** to **All**
* **Close Service Tickets**: Set **Edit**, **Inquire** to **All**
* **Merge Tickets**: Set **Add**, **Edit**, **Inquire** to **All**

**System**

* **My Account**: Set **Add**, **Edit**, **Delete**, **Inquire** to **My**
* **Table Setup**: Set **Add**, **Inquire** to **All** (Additional customization can be done to allow or disallow tables)

**Time & Expense**

* **Time Entry**: Set **Add**, **Edit** and **Inquire** to **All**, **Delete** to **My**
* **Time Entry Billable Option**: Set **Add**, **Edit** and **Inquire** to **All**, **Delete** to **My**

</details>

<details>

<summary>Breakdown of actions per security role</summary>

The following tables outline the various actions the ConnectWise PSA integration can take within Rewst, grouped by their security roles in ConnectWise, and each of their required permission levels to be able to execute them in workflows. We also have a generic request action, that will require any relevant scopes for what it’s being used for. For more information on the ConnectWise API and its required permissions, please refer to the [Official ConnectWise API documentation](https://developer.connectwise.com/).

**Companies**

<table><thead><tr><th width="253">Actions</th><th width="286.3333333333333">API endpoint</th><th>Required permission</th></tr></thead><tbody><tr><td>List Companies</td><td>/company/companies</td><td>Inquire</td></tr><tr><td>Get Company</td><td>/company/companies/{id}</td><td>Inquire</td></tr><tr><td>List Communication Types</td><td>/company/communicationTypes</td><td>Inquire</td></tr><tr><td>List Contacts</td><td>/company/contacts</td><td>Inquire</td></tr><tr><td>Get Contact</td><td>/company/contacts/{id}</td><td>Inquire</td></tr><tr><td>Create Contact</td><td>/company/contacts</td><td>Add</td></tr></tbody></table>

**Service Desk**

<table><thead><tr><th width="260">Actions</th><th width="286.3333333333333">API endpoint</th><th>Required permission</th></tr></thead><tbody><tr><td>List Service Tickets</td><td>/service/tickets</td><td>Inquire</td></tr><tr><td>Get Service Ticket</td><td>/service/tickets/{id}</td><td>Inquire</td></tr><tr><td>Get Tasks</td><td>/service/tickets/{id}/tasks</td><td>Inquire</td></tr><tr><td>Create Task</td><td>/service/tickets/tasks/{id}</td><td>Add</td></tr><tr><td>Create Bulk Tasks</td><td>/service/tickets/tasks/bulk</td><td>Add</td></tr><tr><td>Update Task</td><td>/service/tickets/tasks/{id}</td><td>Edit</td></tr><tr><td>Update Service Ticket</td><td>/service/tickets/{id}</td><td>Edit</td></tr><tr><td>Create Service Ticket</td><td>/service/tickets</td><td>Add</td></tr></tbody></table>

**Time and expense**

<table><thead><tr><th width="265">Actions</th><th width="278.3333333333333">API endpoint</th><th>Required permission</th></tr></thead><tbody><tr><td>Add Time Entry</td><td>/time/entries</td><td>Add</td></tr></tbody></table>

**Finance**

<table><thead><tr><th width="267">Actions</th><th width="276.3333333333333">API endpoint</th><th>Required permission</th></tr></thead><tbody><tr><td>List Agreements</td><td>/finance/agreements</td><td>Inquire</td></tr></tbody></table>

</details>

## Troubleshoot API issues from ConnectWise logs

{% hint style="info" %}
It may be necessary to collect API logs from your ConnectWise PSA to send to ConnectWise for troubleshooting if you encounter issues. The below steps will generate a log for the specific time window you choose.
{% endhint %}

1. Log in to ConnectWise PSA.
2. Navigate to **System > Members**.
3. Click **API Members**. Here, you'll find settings specific to API interactions and configurations.

<figure><img src="https://content.gitbook.com/content/h0G0em3PH6aDfPoI5XpN/blobs/LH7AUZAq097QiT2F4I4v/image.png" alt=""><figcaption></figcaption></figure>

4. Under the **API Members** tab, locate and select the user associated with Rewst's integration.

<figure><img src="https://content.gitbook.com/content/h0G0em3PH6aDfPoI5XpN/blobs/q5xN0U7C4vNSYg1jykow/image.png" alt=""><figcaption></figcaption></figure>

5. After selecting the Rewst user:
   1. Navigate to the **API Logs** tab.
   2. Click **Start Debug Mode**.

<figure><img src="https://content.gitbook.com/content/h0G0em3PH6aDfPoI5XpN/blobs/dfvJBgkrmxD4AB6Lcrhu/image.png" alt=""><figcaption></figcaption></figure>

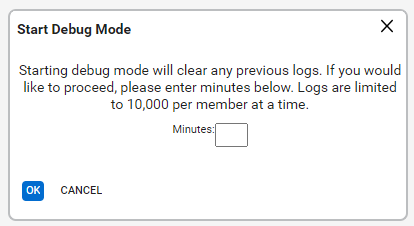
6. In the **Debug Mode** dialog:
   1. Enter length of time in the **Minutes** field. This will capture logs for the specified duration.
   2. Click **Ok**.

<figure><img src="https://content.gitbook.com/content/h0G0em3PH6aDfPoI5XpN/blobs/8zuFhwScmf2ABcMKDQ86/image.png" alt=""><figcaption></figcaption></figure>

{% hint style="success" %}
Got an idea for a new integration? Rewst is constantly adding new integrations to our integrations page. Submit your idea or upvote existing ideas here in our [Canny feedback collector](https://rewst.canny.io/integrations).
{% endhint %}


---

# Agent Instructions
This documentation is published with GitBook. GitBook is the documentation platform designed so that both humans and AI agents can read, navigate, and reason over technical content effectively. Learn more at gitbook.com.

## Querying This Documentation
If you need additional information that is not directly available in this page, you can query the documentation dynamically by asking a question.

Perform an HTTP GET request on the current page URL with the `ask` query parameter, and the optional `goal` query parameter:

```
GET https://docs.rewst.help/rewst-documentation/documentation/integrations/integration-guides/connectwise-integration-setup.md?ask=<question>&goal=<endgoal>
```

`ask` is the immediate question: it should be specific, self-contained, and written in natural language.
`goal` is optional and describes the broader end goal you are ultimately trying to accomplish on behalf of the user. GitBook uses it to tailor the answer towards what is most useful for that goal.

The response will contain a direct answer to the question and relevant excerpts and sources from the documentation.

Use this mechanism when the answer is not explicitly present in the current page, you need clarification or additional context, or you want to retrieve related documentation sections.