> For the complete documentation index, see [llms.txt](https://docs.rewst.help/llms.txt). Markdown versions of documentation pages are available by appending `.md` to page URLs; this page is available as [Markdown](https://docs.rewst.help/rewst-documentation/documentation/integrations/integration-guides/connectwise-control-screenconnect.md).
# ConnectWise ScreenConnect integration
{% hint style="info" %}
If you’re new to integrations in Rewst, read through our introductory integration documentation [here](https://docs.rewst.help/documentation/integrations).
Note that ConnectWise ScreenConnect was previously known as ConnectWise Control. They are the same product, and our ConnectWise Control integration will soon be updated to reflect this name change within ConnectWise's branding.
{% endhint %}
## What does the ConnectWise ScreenConnect integration do?
Run commands on your ConnectWise ScreenConnect agents and get logs from your sessions.
## Set up the ConnectWise ScreenConnect integration
### Setup steps in ConnectWise ScreenConnect
{% hint style="danger" %}
ConnectWise ScreenConnect utilizes the `CustomProperty1` property—typically referenced as `Company` within the UI—to store the organization name.
If you are using this property for another purpose, you will need to update the `CustomProperty1` property to store the organization name.
{% endhint %}
1. Click the **Admin** button on the left-hand side of the screen on your ConnectWise ScreenConnect instance.
2. Click **Security** in the left side menu.
3. Click **Show User Table** under the **Internal** submenu**.**
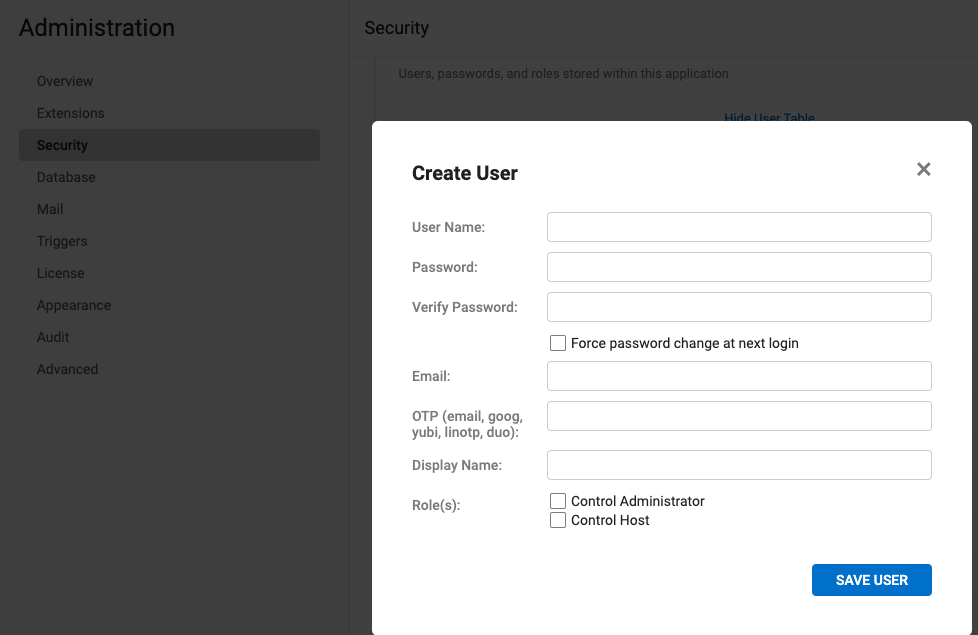
4. Click **Create User**.
5. **Fill out** the required data.
6. Ensure that you check on the following minimum permissions:\

1. Global permissions: **ManageSessionGroups**
2. Scoped permissions:
* **ViewSessionGroup**
* **ViewSessionGuestScreenshot**
* **JoinSession**
* **TransferSession**
* **EditSession**
* **RunCommandOutsideSession**
* **AddNoteToSession**
* **RemoveNoteFromSession**
* **RemoveCommandFromSession**
* **ReinstallSession**
* **TransferFiles**
* **PrintinSession**
* **RunSharedToolAsUser**
* **RunSharedToolAsSystemSilently**
* **RunPersonalToolAsUser**
* **RunPersonalToolAsSystemSilently**
* **HostSessionWithoutConsent**
* **ManageCredentials**
* **SwitchLogonSession**
* **CreateDelegatedAccessToken**
* **EnableBackstageLogonSession**
* **RespondToElevationRequest**
7. Make a note of the **username**, **password**, and **OTP** secret , which you'll need for setup steps in Rewst.
8. Click **Save User**.
{% hint style="warning" %}
The steps to generate your OTP secret will differ depending on your MFA tool. See [ConnectWise's own documentation here](https://docs.connectwise.com/ScreenConnect_Documentation/Get_started/Administration_page/Security_page/Enable_two-factor_authentication_for_host_accounts) for steps pertaining to your particular MFA method.
{% endhint %}
### Setup steps in Rewst
1. Navigate to **Integrations** in the left side menu of your Rewst platform.
2. Search for `ConnectWise Screen Connect` in the integrations page.
3. Click on the integration tile to launch the configuration setup dialog.
4. Choose from either Production or Demo Mode for the setup of your integration:
1. **Production**: Connect with real credentials for live data
2. **Demo Mode**: Explore the integration with simulated mock responses
5. Click **Next: Configure and Authenticate**.
6. Select **+ Create New Credential from the Credential** drop-down selector.
7. Enter the information copied from ConnectWise into the relevant fields:
1. **Username -** ScreenConnect user with permission for the operations you intend to call
2. **Password**
3. **TOTP Secret**
8. Click **Save Credential**.
9. Click **Next: Confirm**.
10. Click **Install Integration**. The integration will now appear in the top Connected section of your Integrations page.
11. Click on the installed integration. Scroll down to the Org Mappings section of the configuration page and complete organization mapping as needed.
## Use custom PowerShell scripts with your RMM integration
This brand of RMM allows PowerShell scripts to be passed via API. To report the script back to Rewst, you'lll need to add a manual webhook action. We recommend using the run PowerShell script subworkflow to handle this for you and if using custom scripts you will need to add this to bottom to ensure the call back to Rewst is made.
```
$postData = $PS_Results | ConvertTo-Json
Invoke-RestMethod -Method 'Post' -Uri $post_url -Body $postData -ContentType 'application/json;
charset=utf-8'
```
## Troubleshoot the ConnectWise ScreenConnect integration
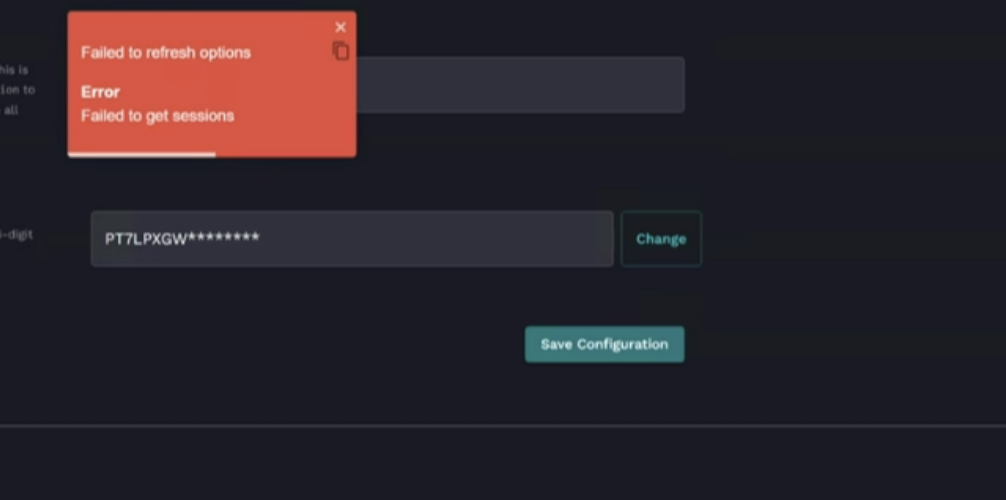
### Failed to refresh options: Error failed to get sessions
The error message will appear in a red box across the configuration screen
In ScreenConnect:
1. Create a session group named `All Machines by Company` and give it a sub group expression of `CustomProperty2`.
2. Create a session group called `All Machines` with no sub group expression.
In Rewst:
1. Navigate to the ConnectWise ScreenConnect integrations' configuration page.
2. Set the following values:
1. Organization Subgroup Expression: `CustomProperty2`
2. Root Session Group: `All Machines by Company`
View ConnectWise's own documentation for how to create a session group in the below video.
{% embed url="" %}
{% hint style="success" %}
Got an idea for a new Integration? Rewst is constantly adding new integrations to our integrations page. Submit your idea or upvote existing ideas here in our [Canny feedback collector](https://rewst.canny.io/integrations).
{% endhint %}
---
# Agent Instructions
This documentation is published with GitBook. GitBook is the documentation platform designed so that both humans and AI agents can read, navigate, and reason over technical content effectively. Learn more at gitbook.com.
## Querying This Documentation
If you need additional information that is not directly available in this page, you can query the documentation by asking a question.
Perform an HTTP GET request on the following URL with the `ask` and `goal` query parameters:
```
GET https://docs.rewst.help/rewst-documentation/documentation/integrations/integration-guides/connectwise-control-screenconnect.md?ask=&goal=
```
`ask` is the immediate question: it should be specific, self-contained, and written in natural language.
`goal` is what the user is ultimately trying to achieve, the reason they need the answer. Sharing it helps GitBook give you a better, more relevant answer. A goal is most helpful when it describes the outcome the user wants rather than restating the question. For example, with `ask=how do I create an API token`, a goal like `automate deployments from our CI pipeline` lets GitBook tailor the answer to that use case.
The response will contain a direct answer to the question and relevant excerpts and sources from the documentation.
Use this mechanism when the answer is not explicitly present in the current page, you need clarification or additional context, or you want to retrieve related documentation sections.